
안녕하세요, 이번 포스팅은 Karpenter on EKS Fargate 배포에 대해서 포스팅을 올립니다.
CloudNet@의 테라폼 스터디 내용을 기반하고 있습니다.
오늘 사용할 Karpenter는 Kubernetes 클러스터 오토스케일러이고,
EKS Fargate는 관리형 서버리스 컨테이너 실행 서비스입니다.
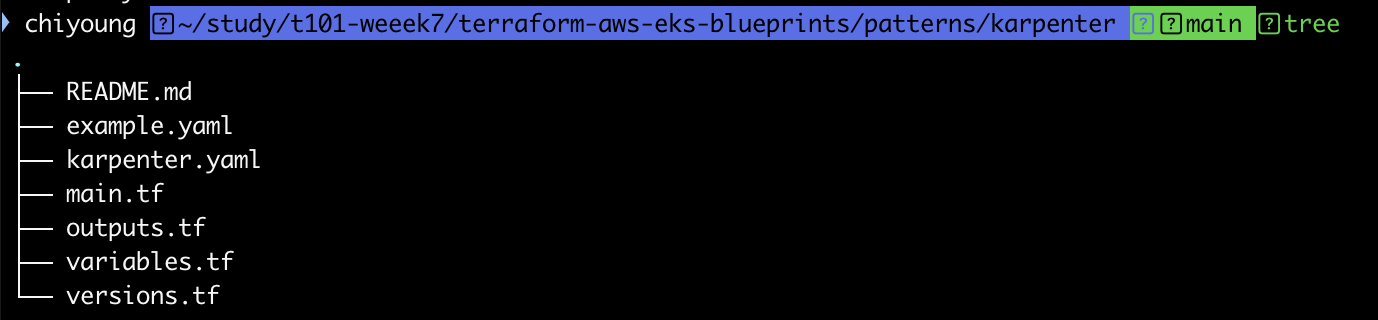
먼저 git clone 후 하기 디렉토리로 이동합니다.
1. git clone
git clone https://github.com/aws-ia/terraform-aws-eks-blueprints
cd terraform-aws-eks-blueprints/patterns/karpenter
tree 명령어를 수행하면 다음과 같이 확인됩니다.
versions.tf는 다음과 같습니다.
2. versions.tf 확인
terraform {
  required_version = ">= 1.3"

  required_providers {
    aws = {
      source  = "hashicorp/aws"
      version = ">= 5.34"
    }
    helm = {
      source  = "hashicorp/helm"
      version = ">= 2.9"
    }
    kubernetes = {
      source  = "hashicorp/kubernetes"
      version = ">= 2.20"
    }
  }

  # ##  Used for end-to-end testing on project; update to suit your needs
  # backend "s3" {
  #   bucket = "terraform-ssp-github-actions-state"
  #   region = "us-west-2"
  #   key    = "e2e/karpenter/terraform.tfstate"
  # }
}
aws, helm, kubernetes 프로바이더의 버전이 명시된 것을 확인합니다.
테라폼도 1.3 이상이 요구됩니다.
3. main.tf 확인
main.tf입니다.
provider "aws" {
  region = local.region
}

# Required for public ECR where Karpenter artifacts are hosted
provider "aws" {
  region = "us-east-1"
  alias  = "virginia"
}

provider "kubernetes" {
  host                   = module.eks.cluster_endpoint
  cluster_ca_certificate = base64decode(module.eks.cluster_certificate_authority_data)

  exec {
    api_version = "client.authentication.k8s.io/v1beta1"
    command     = "aws"
    # This requires the awscli to be installed locally where Terraform is executed
    args = ["eks", "get-token", "--cluster-name", module.eks.cluster_name]
  }
}

provider "helm" {
  kubernetes {
    host                   = module.eks.cluster_endpoint
    cluster_ca_certificate = base64decode(module.eks.cluster_certificate_authority_data)

    exec {
      api_version = "client.authentication.k8s.io/v1beta1"
      command     = "aws"
      # This requires the awscli to be installed locally where Terraform is executed
      args = ["eks", "get-token", "--cluster-name", module.eks.cluster_name]
    }
  }
}

data "aws_ecrpublic_authorization_token" "token" {
  provider = aws.virginia
}

data "aws_availability_zones" "available" {}

locals {
  name   = "t101-${basename(path.cwd)}"
  region = "ap-northeast-2"

  vpc_cidr = "10.10.0.0/16"
  azs      = slice(data.aws_availability_zones.available.names, 0, 3)

  tags = {
    Blueprint  = local.name
    GithubRepo = "github.com/aws-ia/terraform-aws-eks-blueprints"
  }
}

################################################################################
# Cluster
################################################################################

module "eks" {
  source  = "terraform-aws-modules/eks/aws"
  version = "~> 20.11"

  cluster_name                   = local.name
  cluster_version                = "1.30"
  cluster_endpoint_public_access = true

  vpc_id     = module.vpc.vpc_id
  subnet_ids = module.vpc.private_subnets

  # Fargate profiles use the cluster primary security group so these are not utilized
  create_cluster_security_group = false
  create_node_security_group    = false

  enable_cluster_creator_admin_permissions = true

  fargate_profiles = {
    karpenter = {
      selectors = [
        { namespace = "karpenter" }
      ]
    }
    kube_system = {
      name = "kube-system"
      selectors = [
        { namespace = "kube-system" }
      ]
    }
  }

  tags = merge(local.tags, {
    # NOTE - if creating multiple security groups with this module, only tag the
    # security group that Karpenter should utilize with the following tag
    # (i.e. - at most, only one security group should have this tag in your account)
    "karpenter.sh/discovery" = local.name
  })
}

################################################################################
# EKS Blueprints Addons
################################################################################

module "eks_blueprints_addons" {
  source  = "aws-ia/eks-blueprints-addons/aws"
  version = "~> 1.16"

  cluster_name      = module.eks.cluster_name
  cluster_endpoint  = module.eks.cluster_endpoint
  cluster_version   = module.eks.cluster_version
  oidc_provider_arn = module.eks.oidc_provider_arn

  # We want to wait for the Fargate profiles to be deployed first
  create_delay_dependencies = [for prof in module.eks.fargate_profiles : prof.fargate_profile_arn]

  eks_addons = {
    coredns = {
      configuration_values = jsonencode({
        computeType = "Fargate"
        # Ensure that the we fully utilize the minimum amount of resources that are supplied by
        # Fargate https://docs.aws.amazon.com/eks/latest/userguide/fargate-pod-configuration.html
        # Fargate adds 256 MB to each pod's memory reservation for the required Kubernetes
        # components (kubelet, kube-proxy, and containerd). Fargate rounds up to the following
        # compute configuration that most closely matches the sum of vCPU and memory requests in
        # order to ensure pods always have the resources that they need to run.
        resources = {
          limits = {
            cpu = "0.25"
            # We are targeting the smallest Task size of 512Mb, so we subtract 256Mb from the
            # request/limit to ensure we can fit within that task
            memory = "256M"
          }
          requests = {
            cpu = "0.25"
            # We are targeting the smallest Task size of 512Mb, so we subtract 256Mb from the
            # request/limit to ensure we can fit within that task
            memory = "256M"
          }
        }
      })
    }
    vpc-cni    = {}
    kube-proxy = {}
  }

  enable_karpenter = true

  karpenter = {
    repository_username = data.aws_ecrpublic_authorization_token.token.user_name
    repository_password = data.aws_ecrpublic_authorization_token.token.password
  }

  karpenter_node = {
    # Use static name so that it matches what is defined in `karpenter.yaml` example manifest
    iam_role_use_name_prefix = false
  }

  tags = local.tags
}

resource "aws_eks_access_entry" "karpenter_node_access_entry" {
  cluster_name      = module.eks.cluster_name
  principal_arn     = module.eks_blueprints_addons.karpenter.node_iam_role_arn
  kubernetes_groups = []
  type              = "EC2_LINUX"
}

################################################################################
# Supporting Resources
################################################################################

module "vpc" {
  source  = "terraform-aws-modules/vpc/aws"
  version = "~> 5.0"

  name = local.name
  cidr = local.vpc_cidr

  azs             = local.azs
  private_subnets = [for k, v in local.azs : cidrsubnet(local.vpc_cidr, 4, k)]
  public_subnets  = [for k, v in local.azs : cidrsubnet(local.vpc_cidr, 8, k + 48)]

  enable_nat_gateway = true
  single_nat_gateway = true

  public_subnet_tags = {
    "kubernetes.io/role/elb" = 1
  }

  private_subnet_tags = {
    "kubernetes.io/role/internal-elb" = 1
    # Tags subnets for Karpenter auto-discovery
    "karpenter.sh/discovery" = local.name
  }

  tags = local.tags
}
locals 블록을 수정합니다.
locals {
  name   = "t101-${basename(path.cwd)}"
  region = "ap-northeast-2"

  vpc_cidr = "10.10.0.0/16"
  azs      = slice(data.aws_availability_zones.available.names, 0, 3)

  tags = {
    Blueprint  = local.name
    GithubRepo = "github.com/aws-ia/terraform-aws-eks-blueprints"
  }
}
4. outputs.tf 확인
outputs.tf
output "configure_kubectl" {
  description = "Configure kubectl: make sure you're logged in with the correct AWS profile and run the following command to update your kubeconfig"
  value       = "aws eks --region ${local.region} update-kubeconfig --name ${module.eks.cluster_name}"
}
그런 다음, 다음의 명령어를 통해서 확인해 봅니다.
terraform init
tree .terraform
cat .terraform/**modules**/modules.json | jq
tree .terraform/**providers**/registry.terraform.io/hashicorp -L 2
본격적으로, vpc 배포를 진행해 보겠습니다.
다음의 명령어를 통해 기본 vpc를 제외한 vpc 정보를 불러옵니다.
aws ec2 describe-vpcs --filter 'Name=isDefault,Values=false' --output yaml
4. vpc 생성
그런 다음, module.vpc만 호출하여 vpc를 생성합니다.
terraform apply -target="module.vpc" -auto-approve
적용 완료된 내용을 확인합니다.

배포 내용도 확인해 보겠습니다.
terraform state list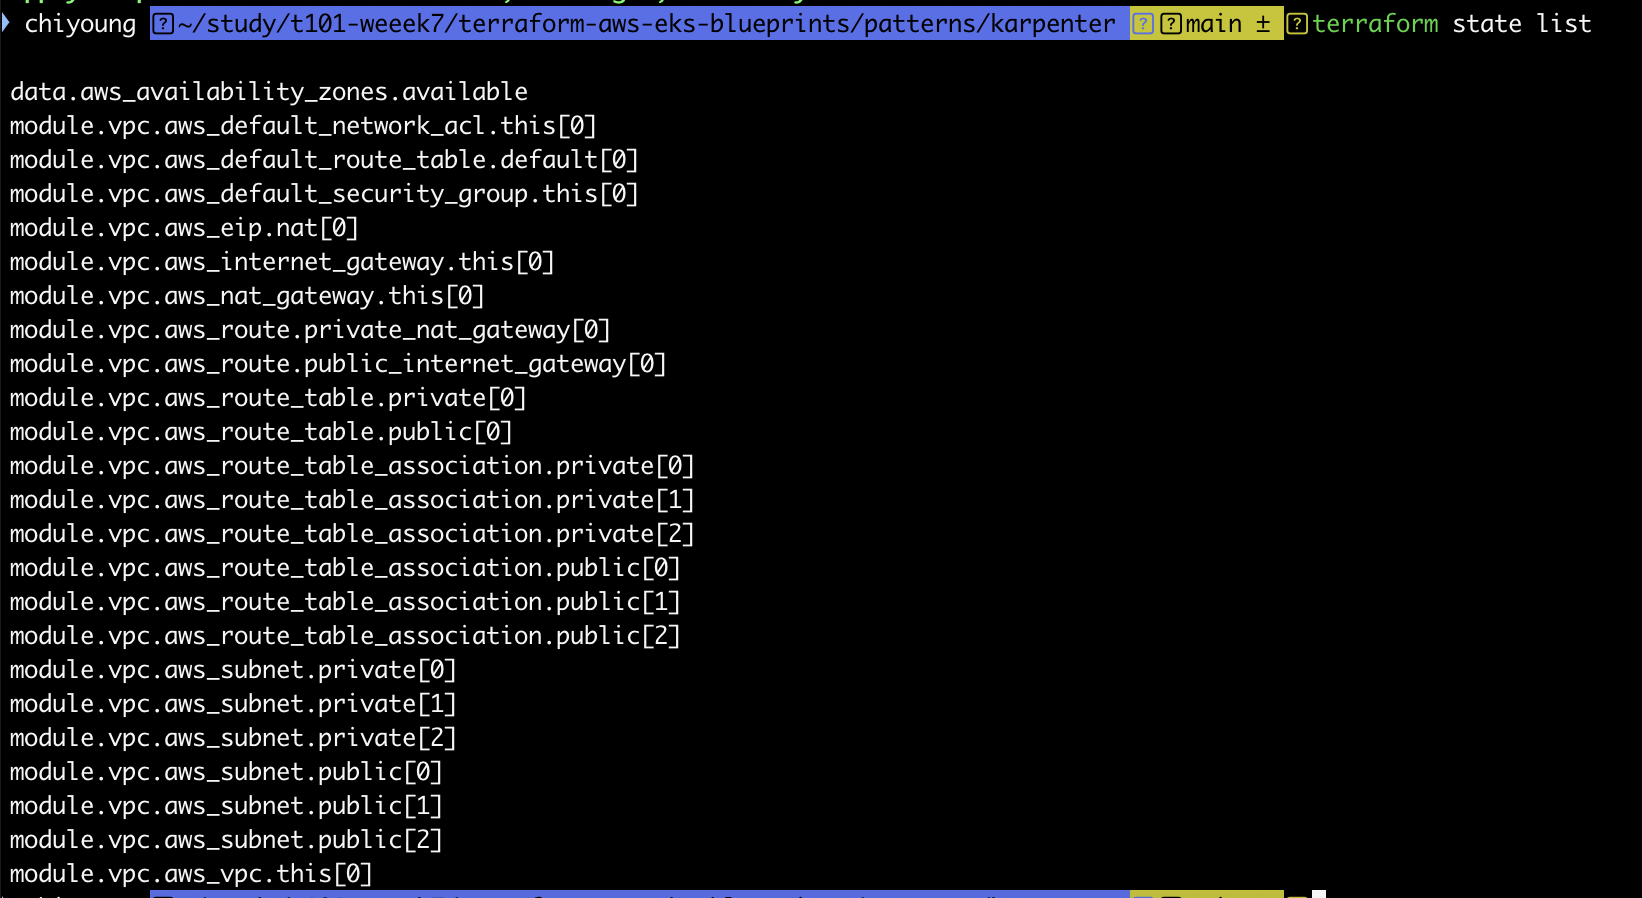
terraform show를 통해서 적용된 tfstate 파일을 확인할 수 있습니다.
terraform show
다시 다음 명령을 수행하여 vpc 정보를 확인합니다.
aws ec2 describe-vpcs --filter 'Name=isDefault,Values=false' --output yaml
그리고 다음의 내용을 통해서 vpc를 확인해 봅니다.
echo "data.aws_availability_zones.available" | terraform console
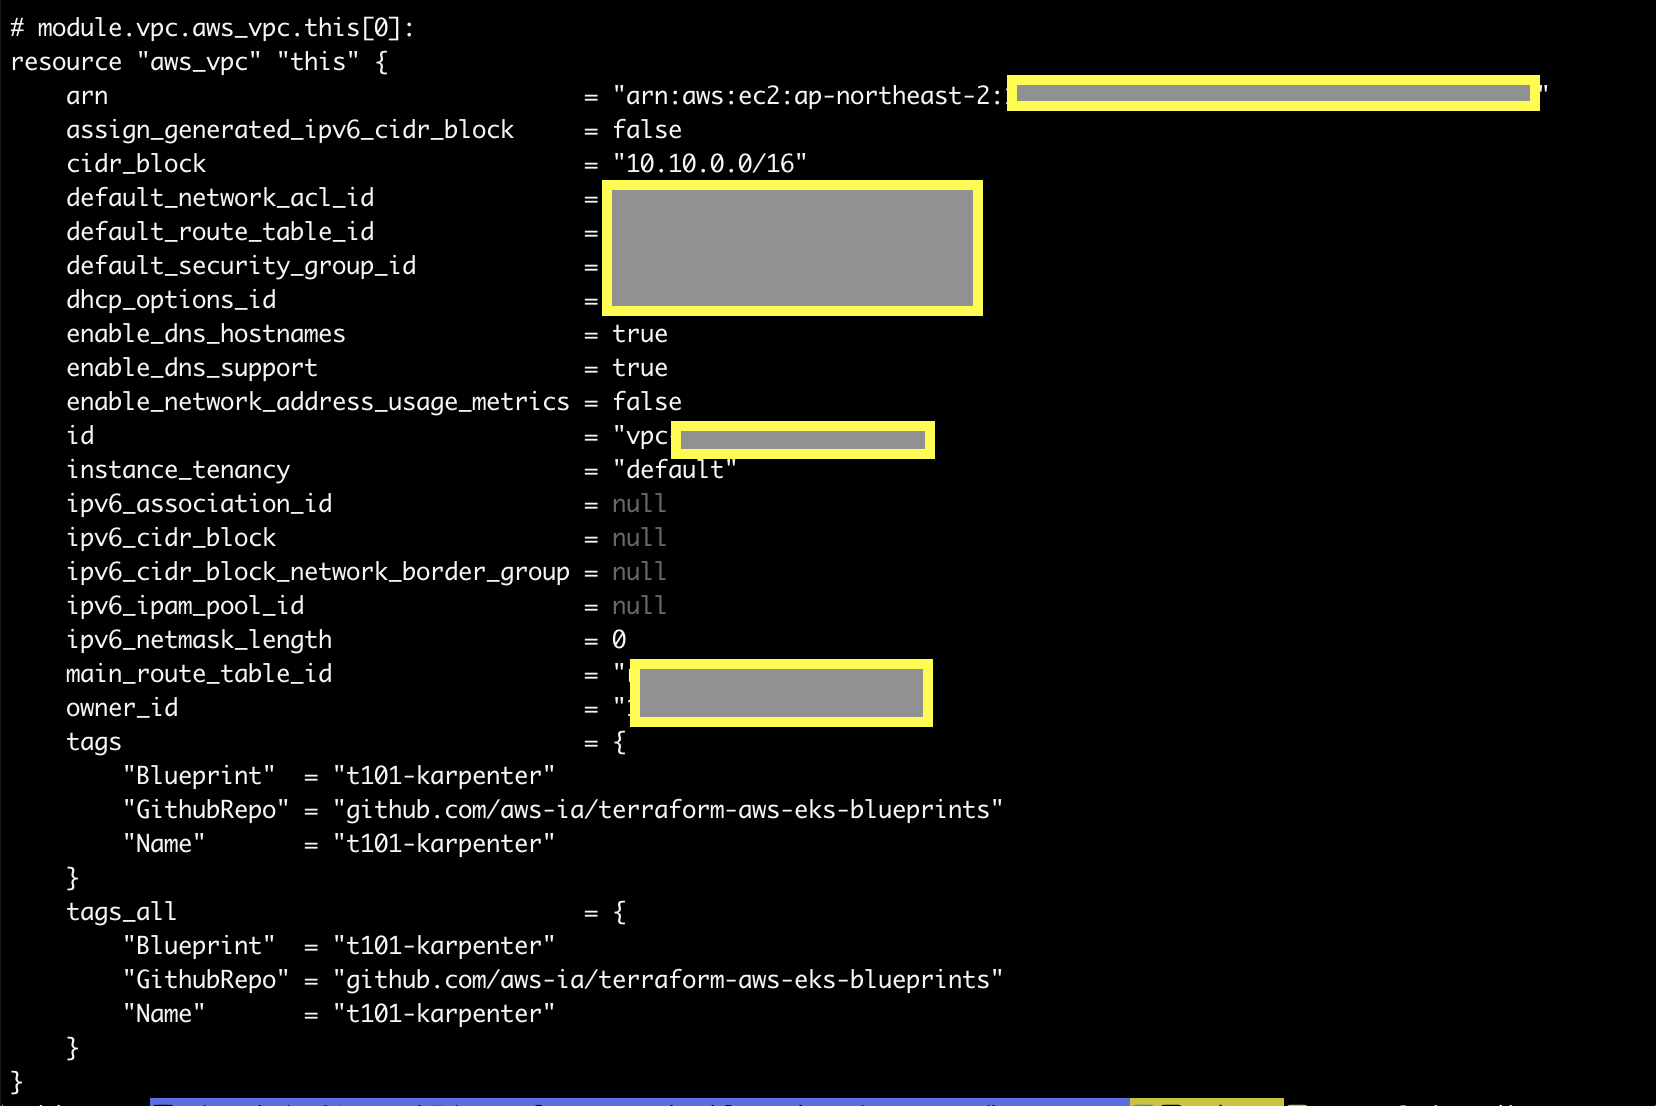
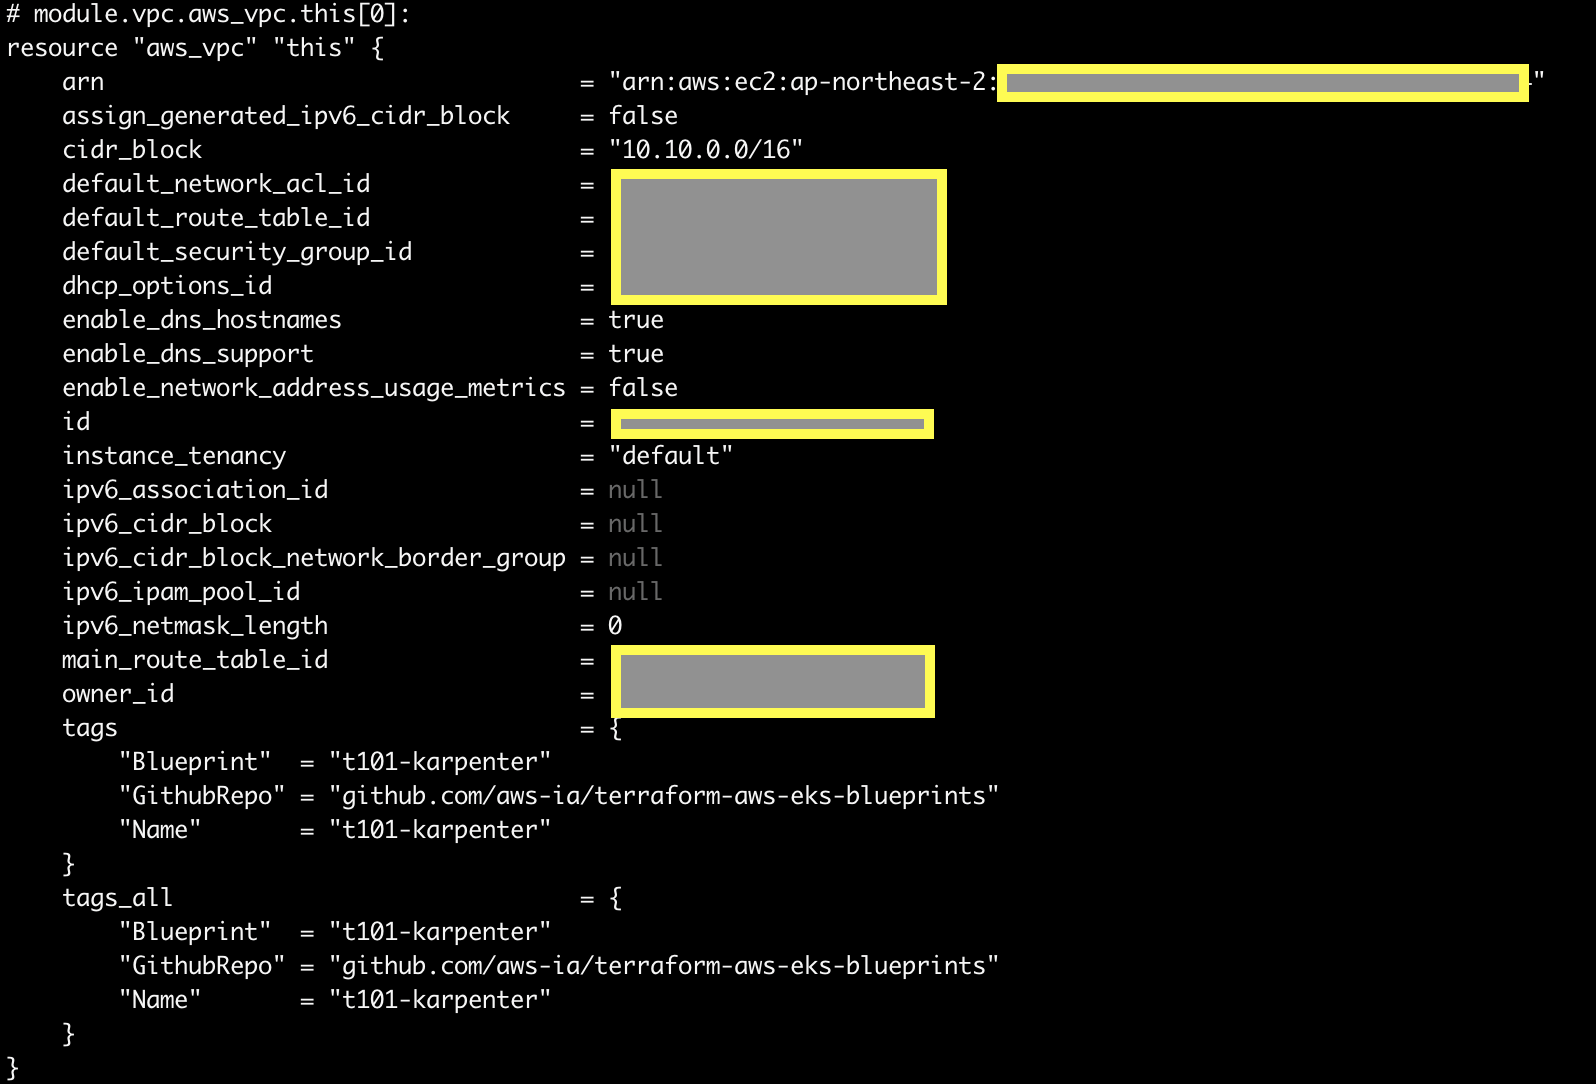
terraform state show 'module.vpc.aws_vpc.this[0]'
terraform state show를 통해서 확인할 수 있는 생성된 vpc의 내용입니다.
다음 내용을 통해서 vpc에 매핑된 subnet을 확인합니다.
VPCID=<생성한 VPC ID>
aws ec2 describe-subnets --filters "Name=vpc-id,Values=$VPCID" | jq
aws ec2 describe-subnets --filters "Name=vpc-id,Values=$VPCID" --output text
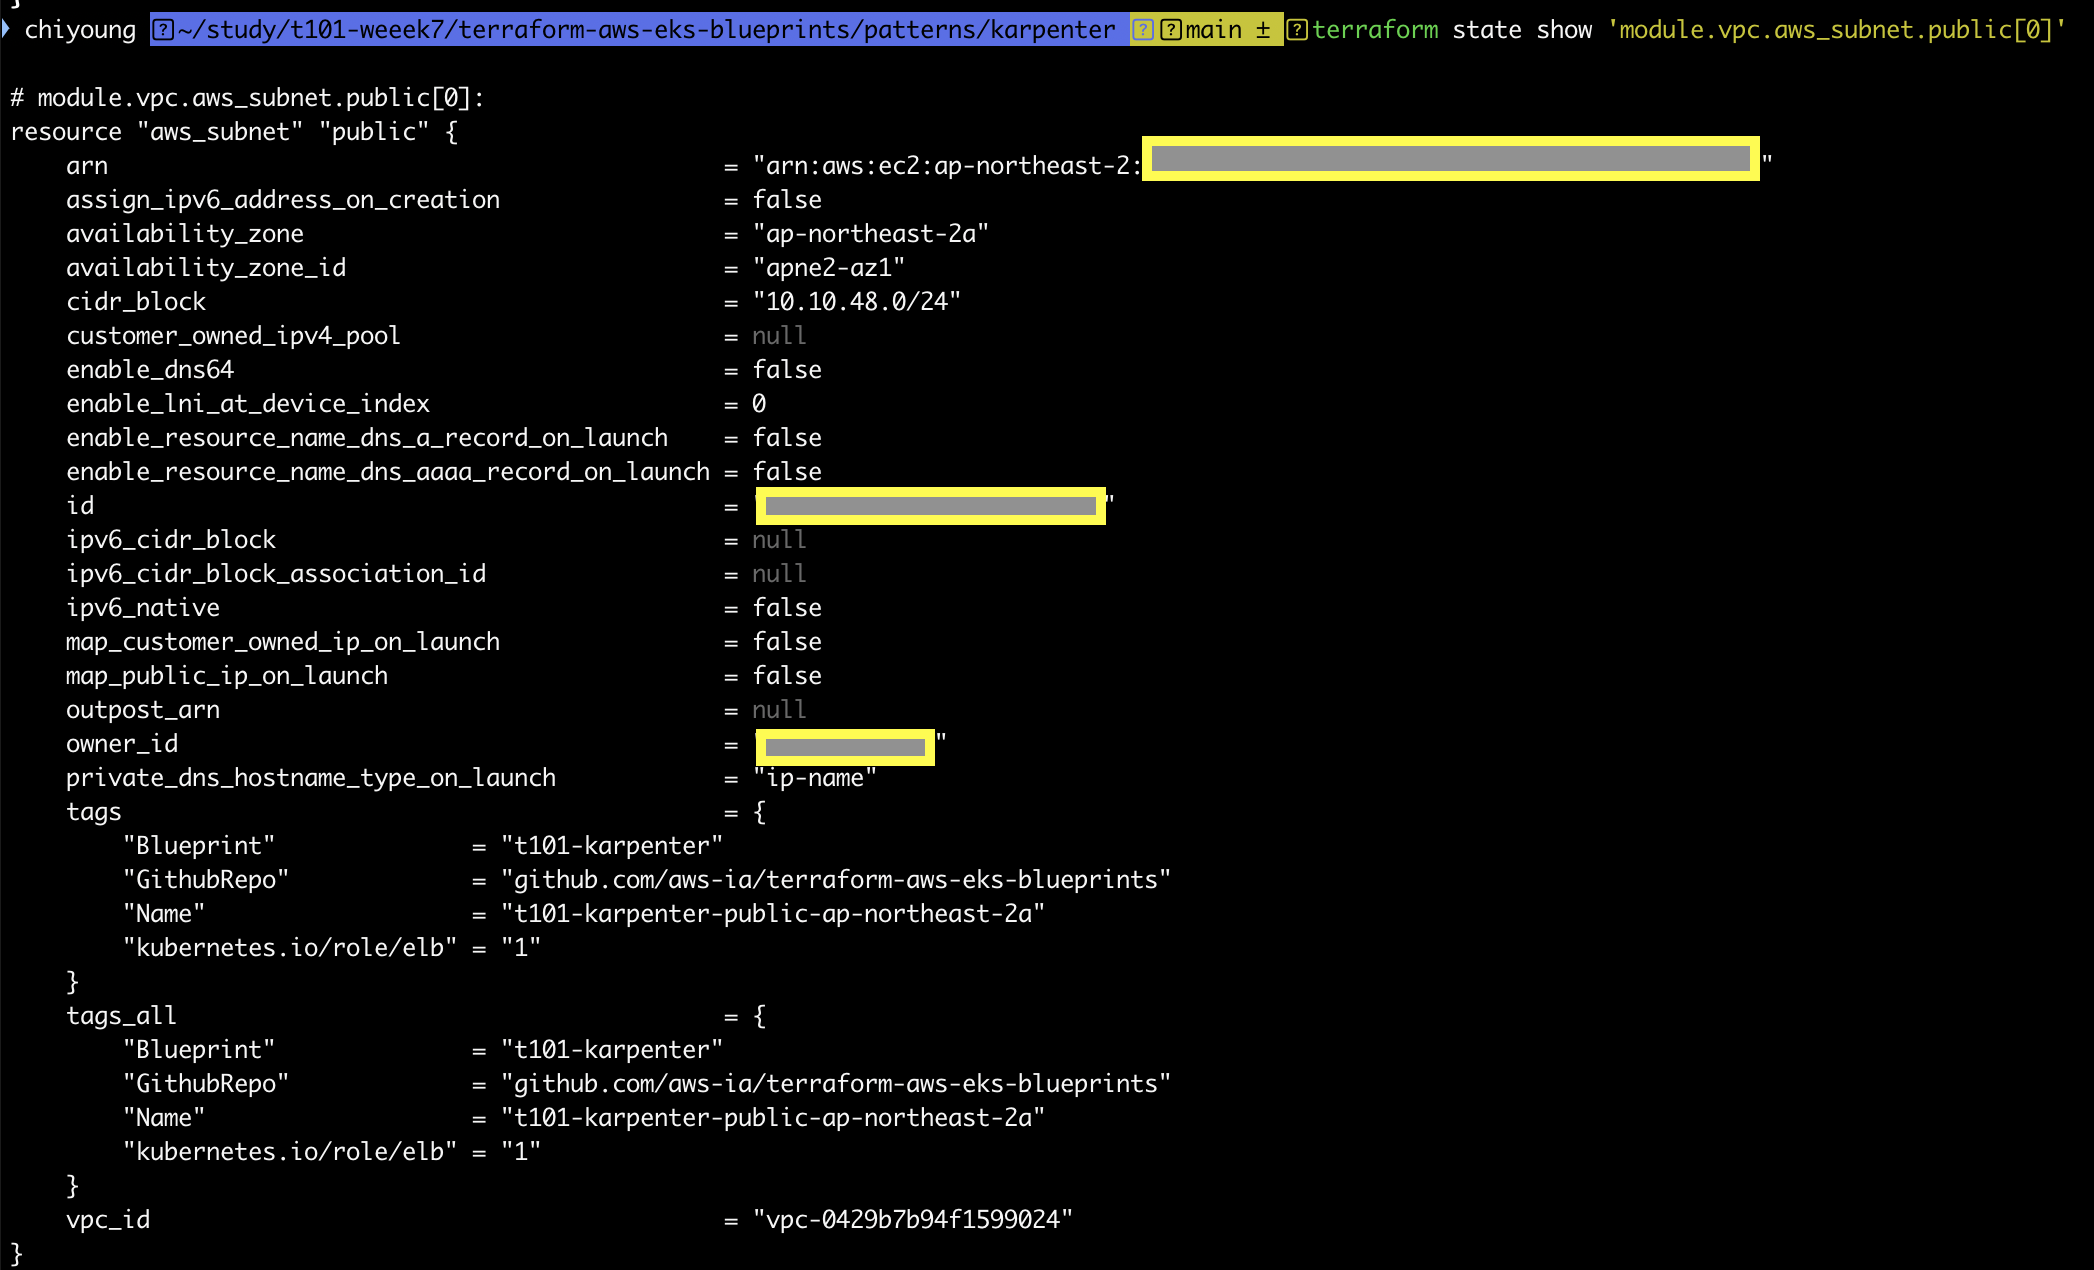
terraform state show 'module.vpc.aws_subnet.public[0]'
terraform state show 'module.vpc.aws_subnet.private[0]'
퍼블릭 서브넷 확인 예시 :
5. eks 클러스터 생성
다음의 명령어를 통해서 module.eks를 생성해 보겠습니다.
다소 시간이 걸릴 수 있으니 커피 한잔 하시면서 느긋하게 기다려 보세요!
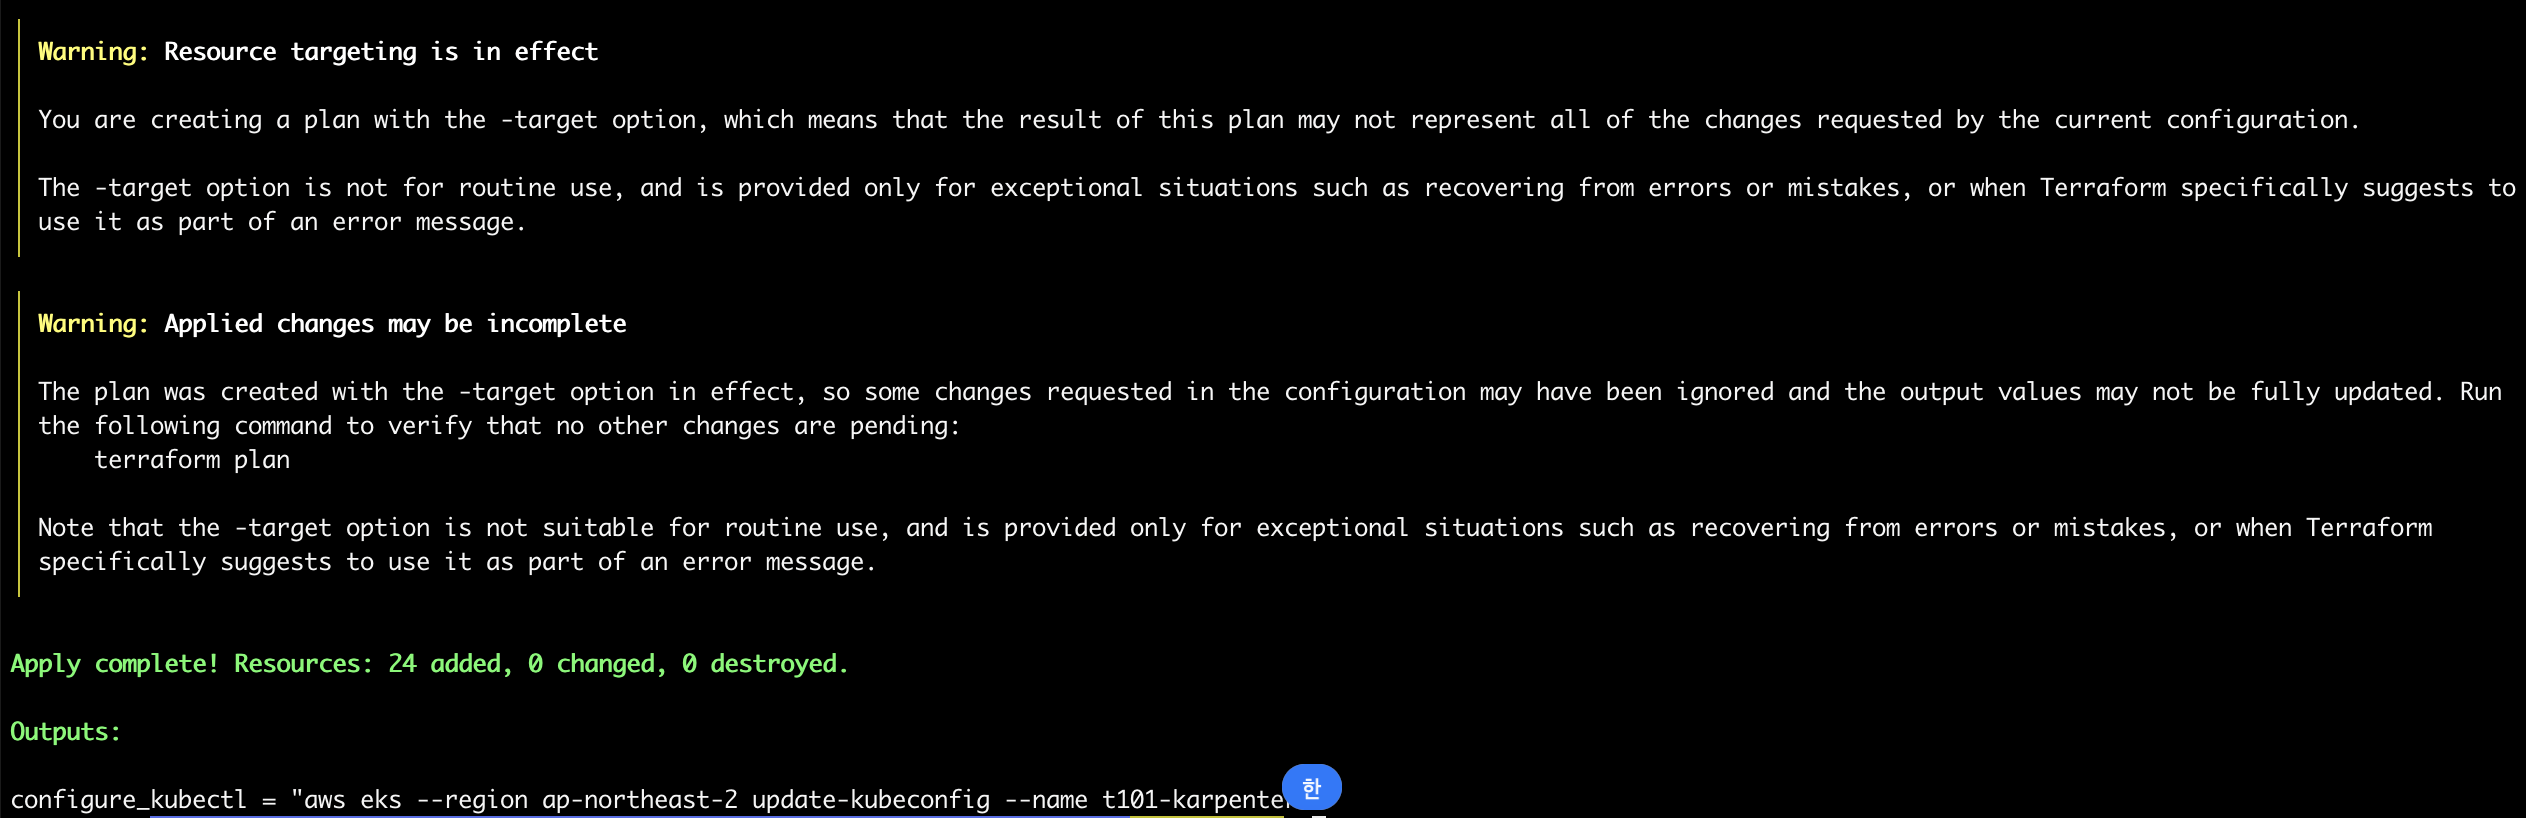
terraform apply -target="module.eks" -auto-approve
앞서 설정한 outputs.tf 파일의 내용대로 출력이 되는 것을 확인하실 수 있습니다.
그런 다음, terraform state list를 출력해 봅니다.
terraform state list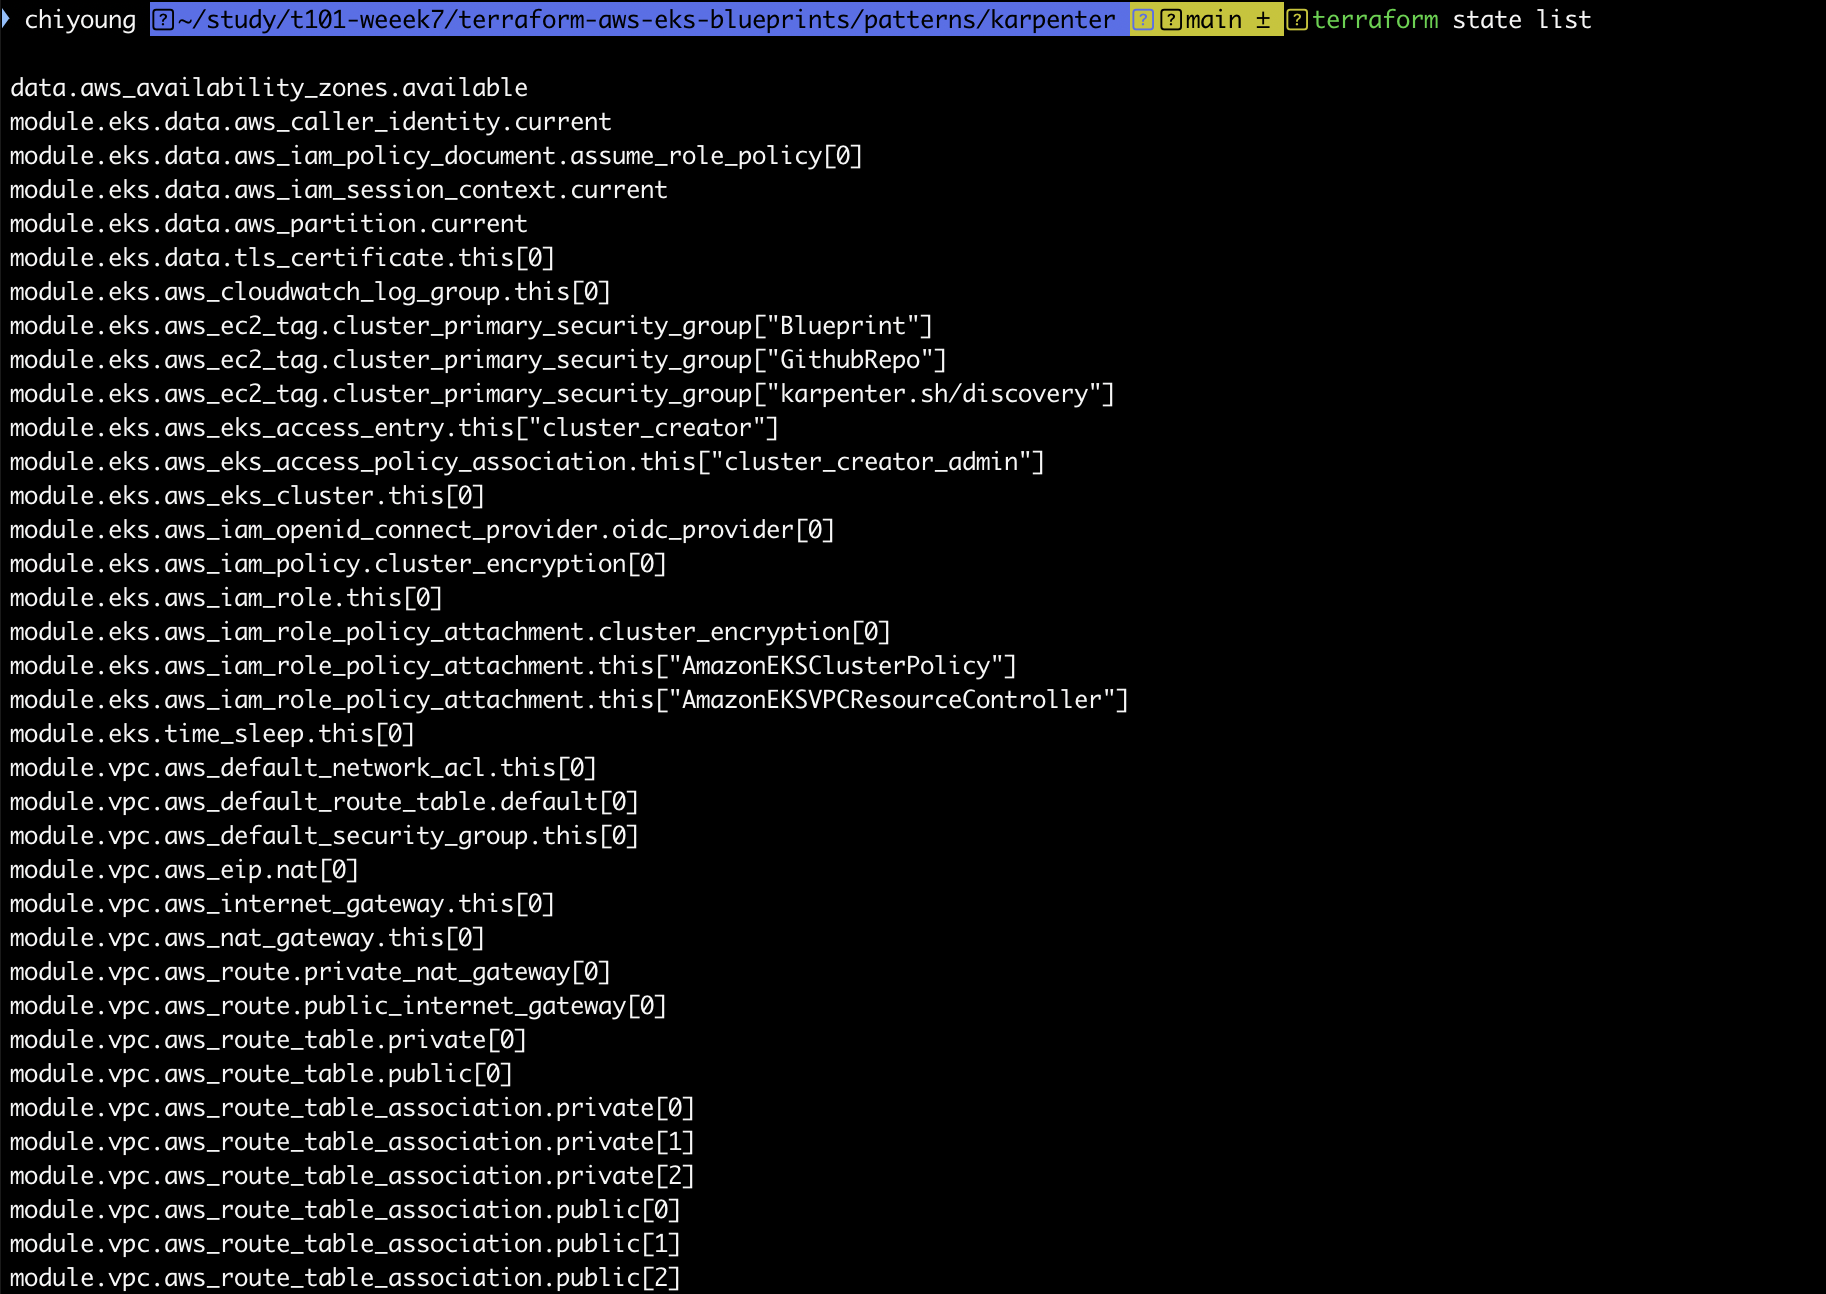
하기 명령을 수행하면 클러스터 생성시 나온 내용과 동일합니다.
terraform output
configure_kubectl = "aws eks --region ap-northeast-2 update-kubeconfig --name t101-karpenter"
다음으로 EKS 자격증명을 세팅하고, context 이름을 변경하겠습니다.
aws eks --region ap-northeast-2 update-kubeconfig --name t101-karpenter
kubectl config rename-context "arn:aws:eks:ap-northeast-2:$(aws sts get-caller-identity --query 'Account' --output text):cluster/t101-karpenter" "T101-Lab"
다음으로 클러스터 / 노드 / 파드 정보를 확인합니다.
kubectl cluster-info
kubectl get node
kubectl get pod -A
이제 Fargate를 배포해 보겠습니다.
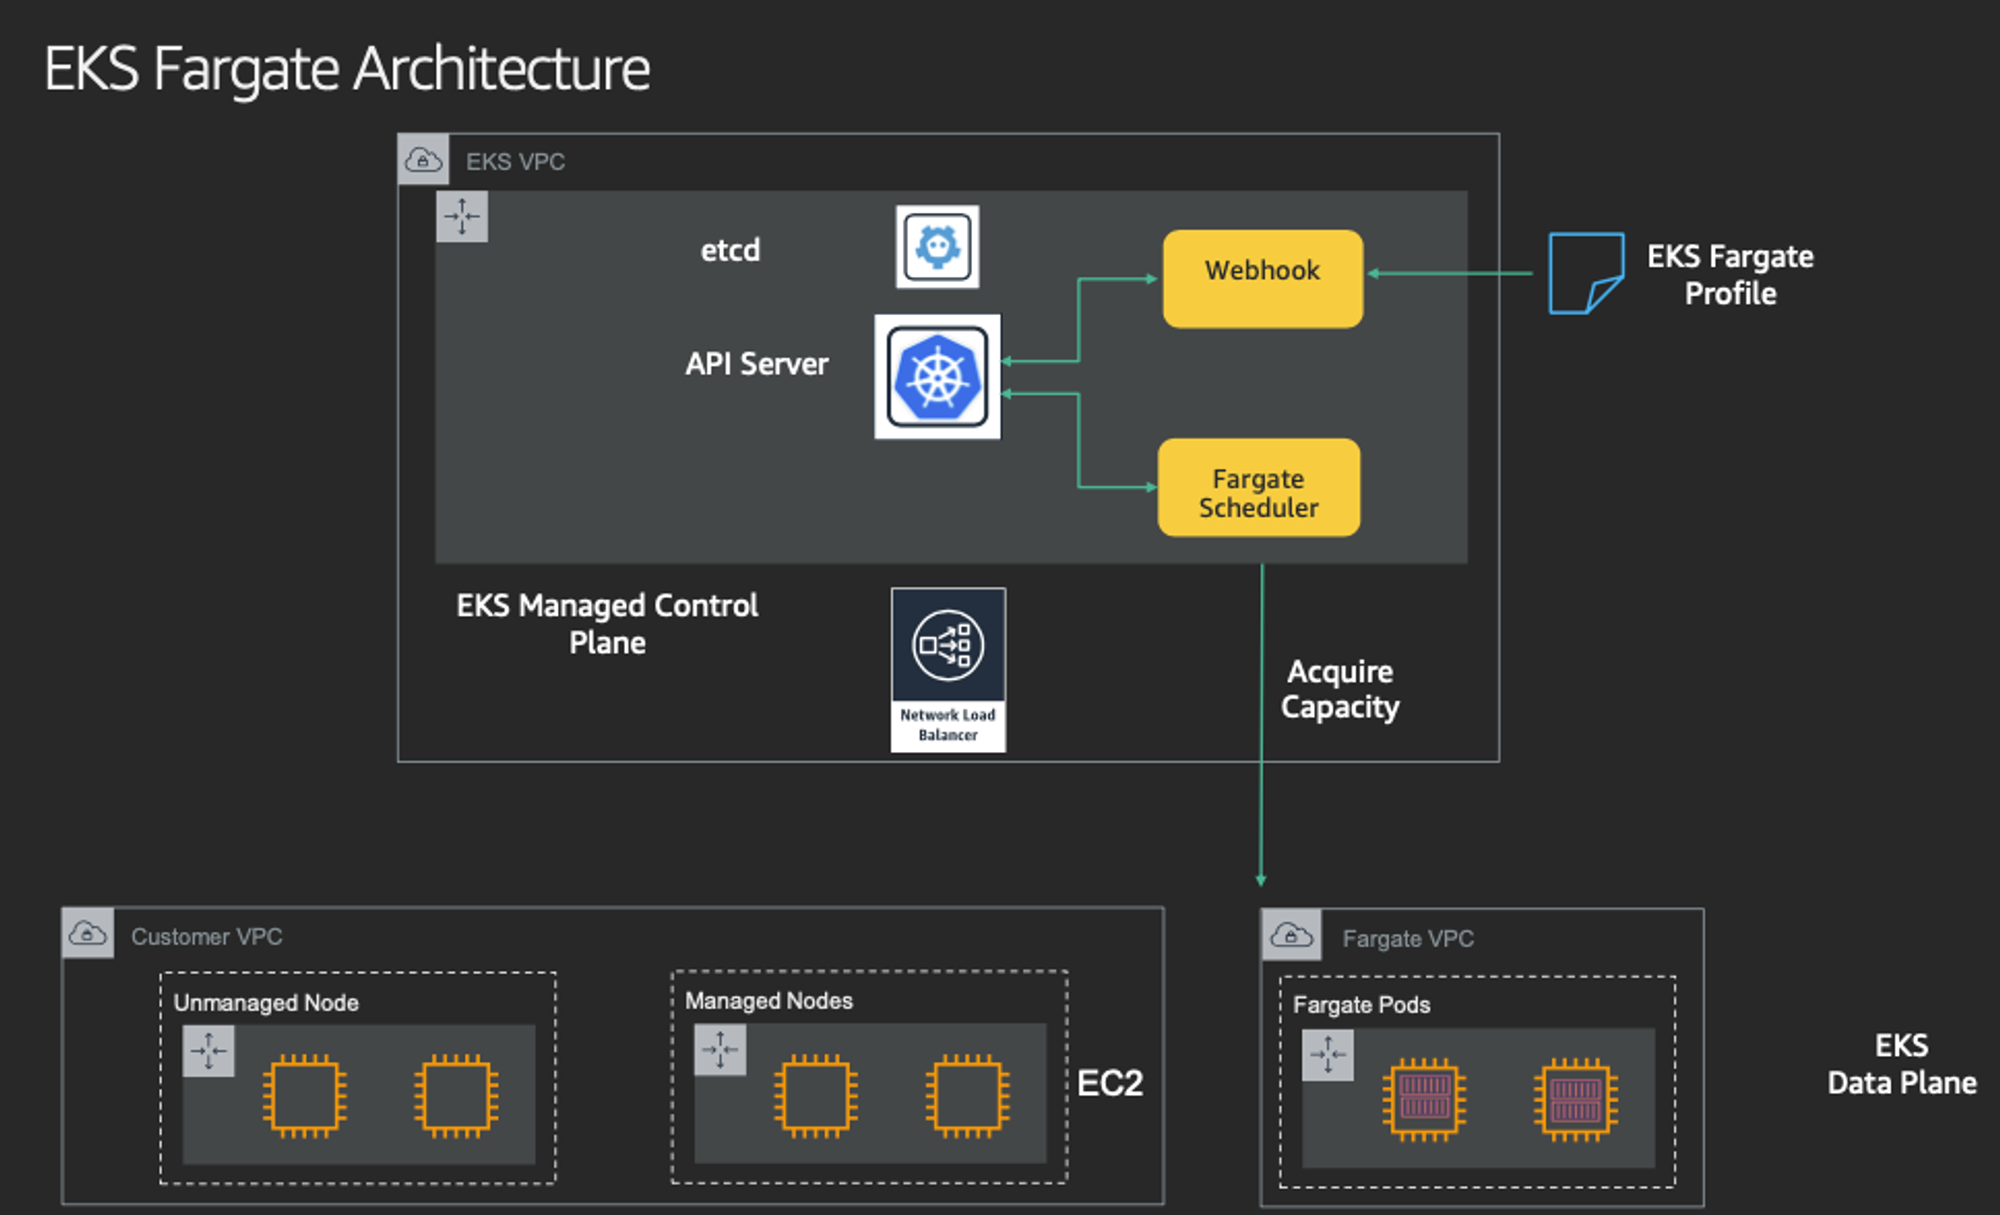
6. Fargate 개요
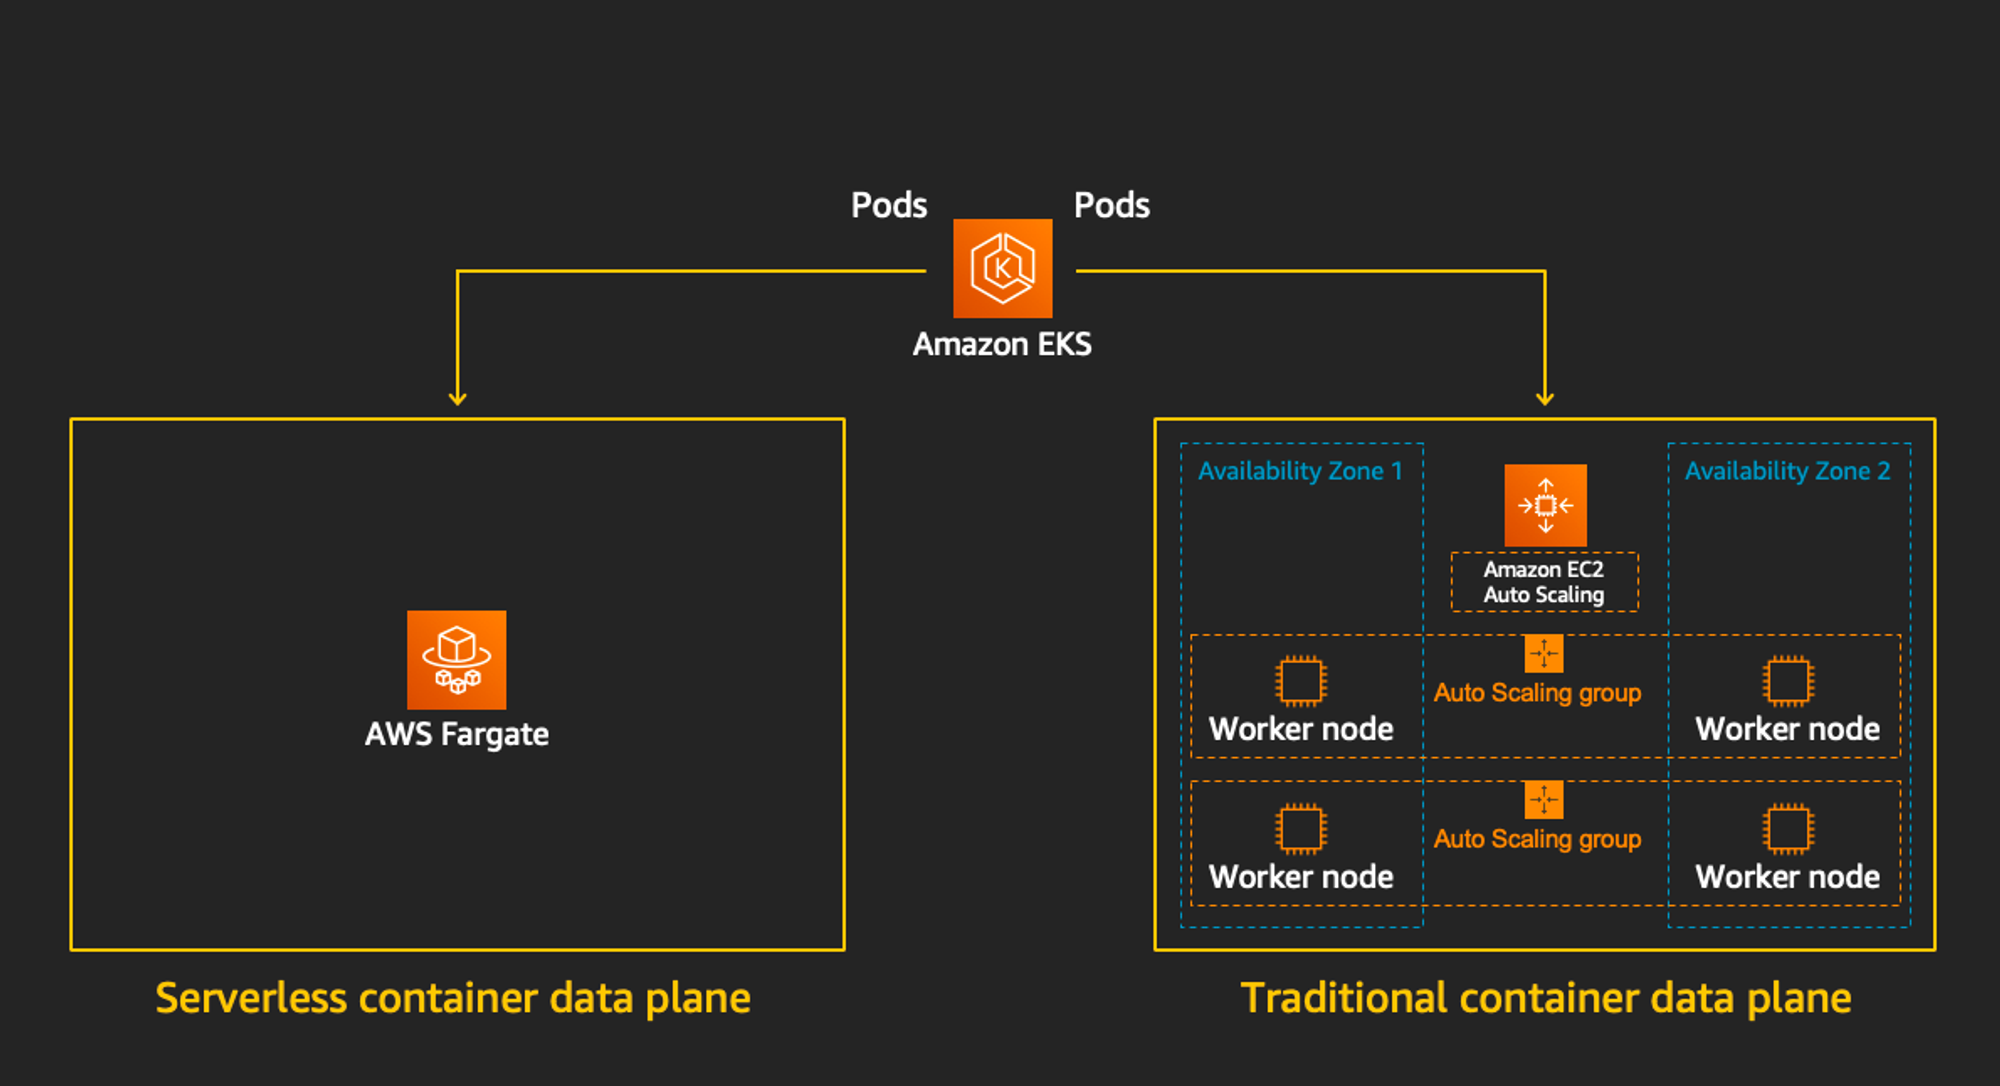
Cluster Autoscaler가 필요하지 않고, VM 수준의 격리가 가능하다는 것이 특징입니다.
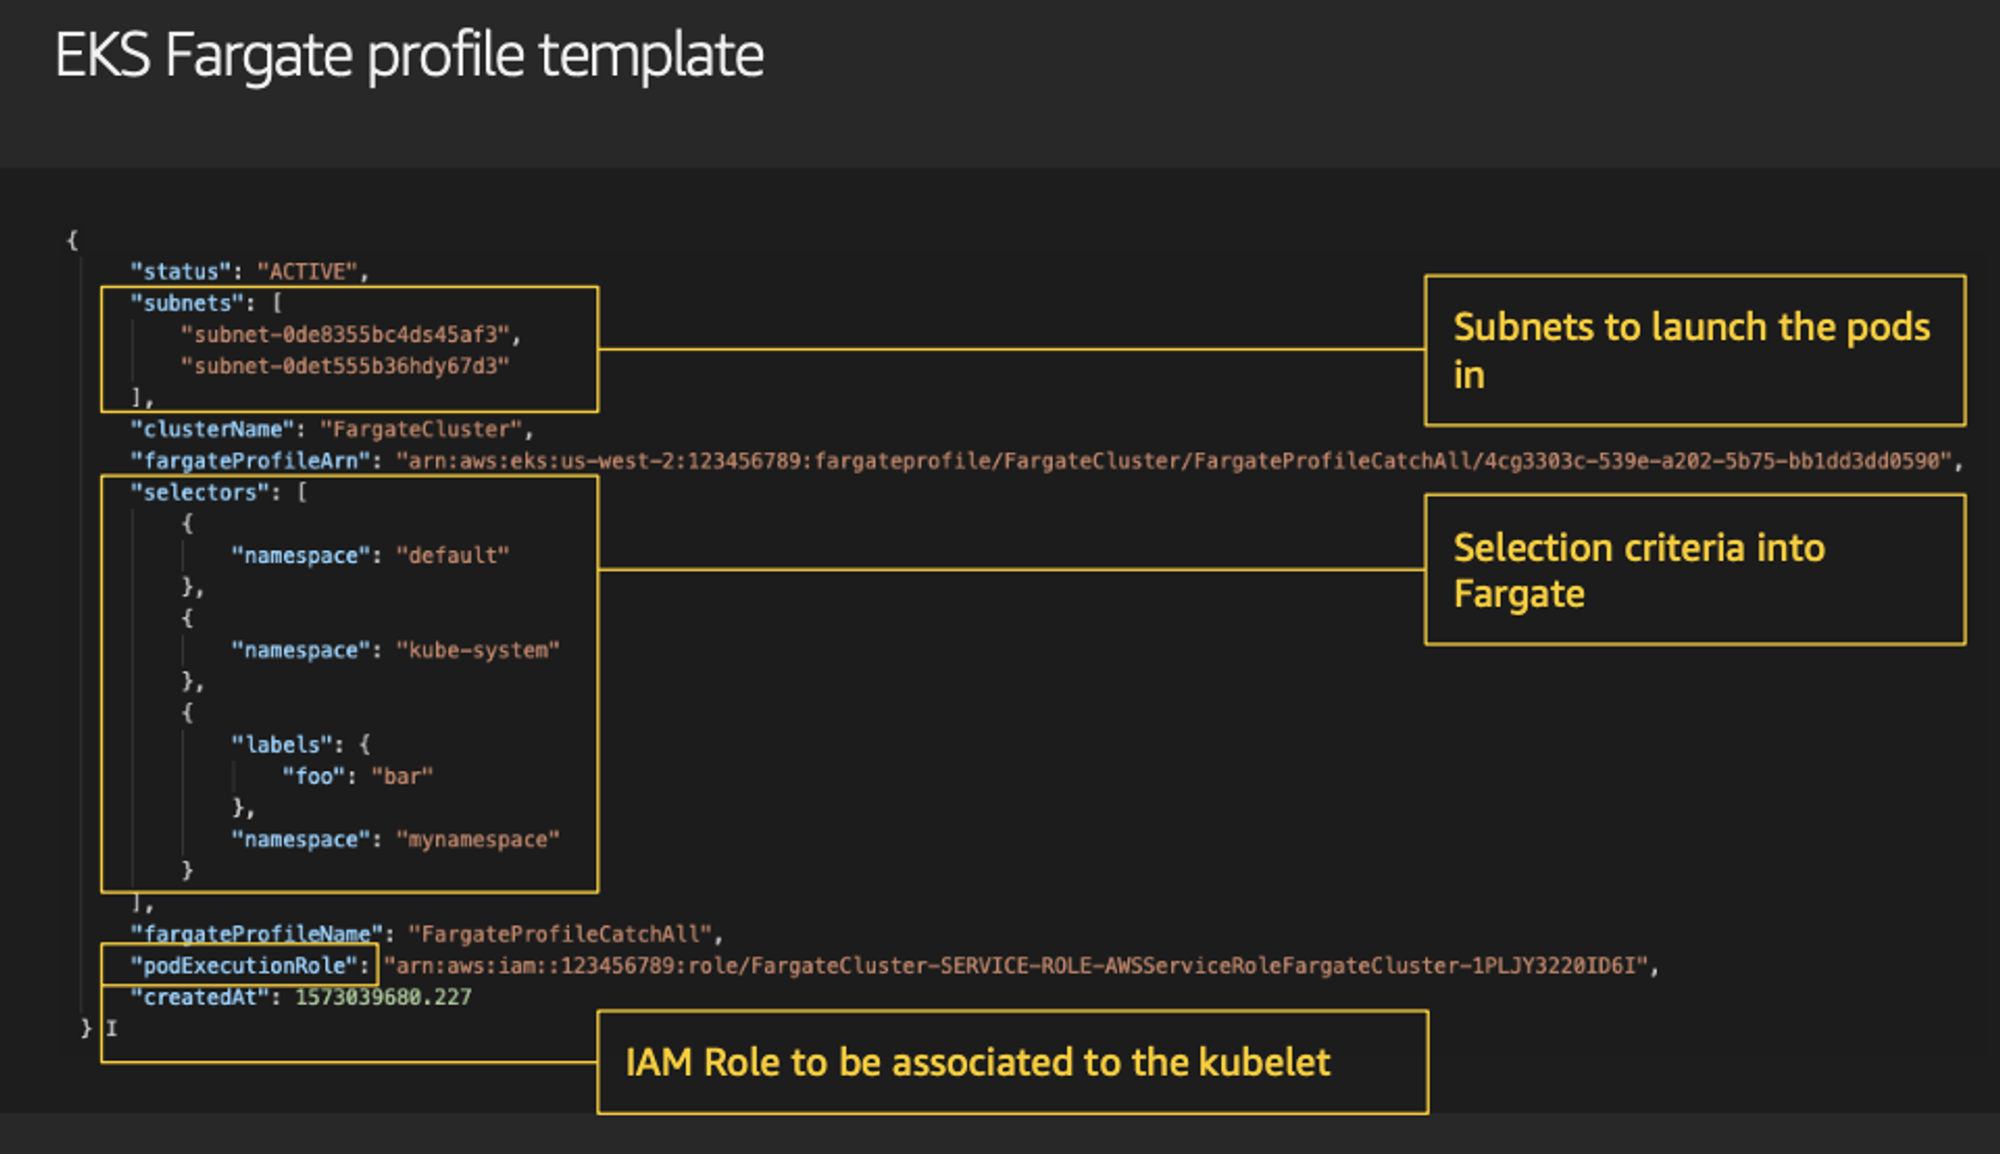
파게이트 프로파일을 통해서 파드가 사용할 서브넷, 네임스페이스, 레이블을 설정할 수 있습니다.
또한 eks 파게이트 스케줄러를 통해서 노드 스케줄링을 설정할 수 있습니다.
7. 리소스 배포
terraform apply -auto-approve
다음의 명령으로 state file을 확인합니다.
terraform state list
이후 배포된 클러스터와 노드 정보를 확인합니다.
kubectl cluster-info
kubectl get nodes -L node.kubernetes.io/instance-type -L topology.kubernetes.io/zone
kubectl get node -owide
노드 정보 확인 :

파드 정보도 확인해 줍니다.
kubectl get pod -A
배포된 헬름 차트도 확인합니다.
helm list -n karpenter

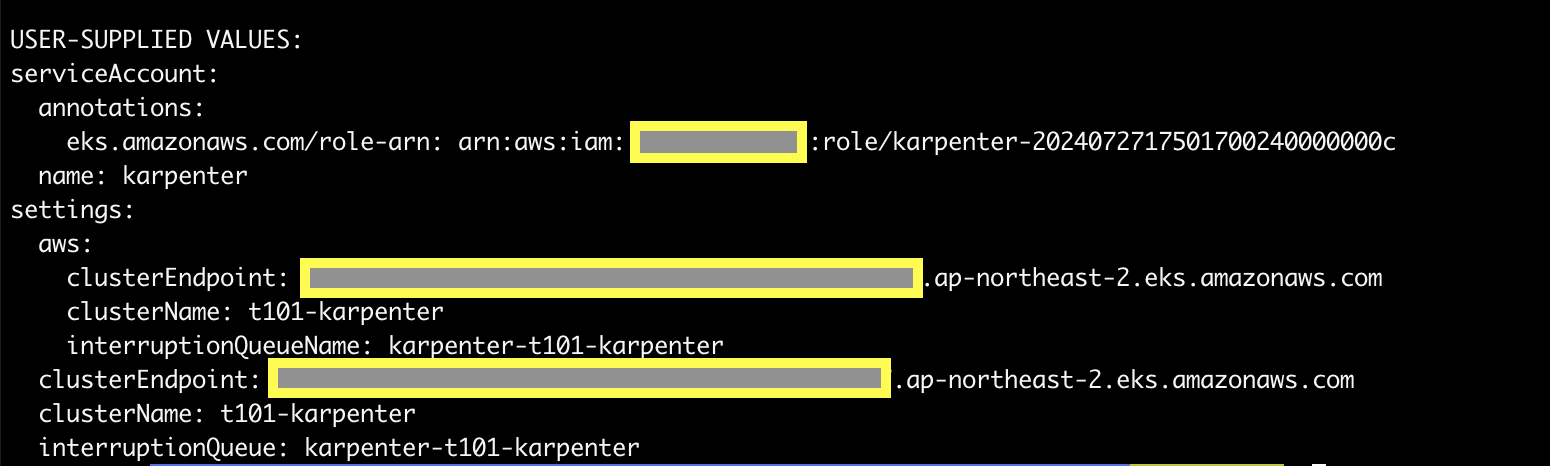
하기 명령을 통해서 karpenter helm chart에 적용된 값을 확인해 봅니다.
helm get values -n karpenter karpenter
적용된 시크릿 정보는 다음의 명령을 통해서 확인합니다.
* 이때, 암호화 적용을 활성화 한다면 비활성화가 불가하니 이 점 유의해 주시기 바랍니다.
kubectl get secret -n karpenter
kubectl get secret -n karpenter sh.helm.release.v1.karpenter.v1 -o json | jq
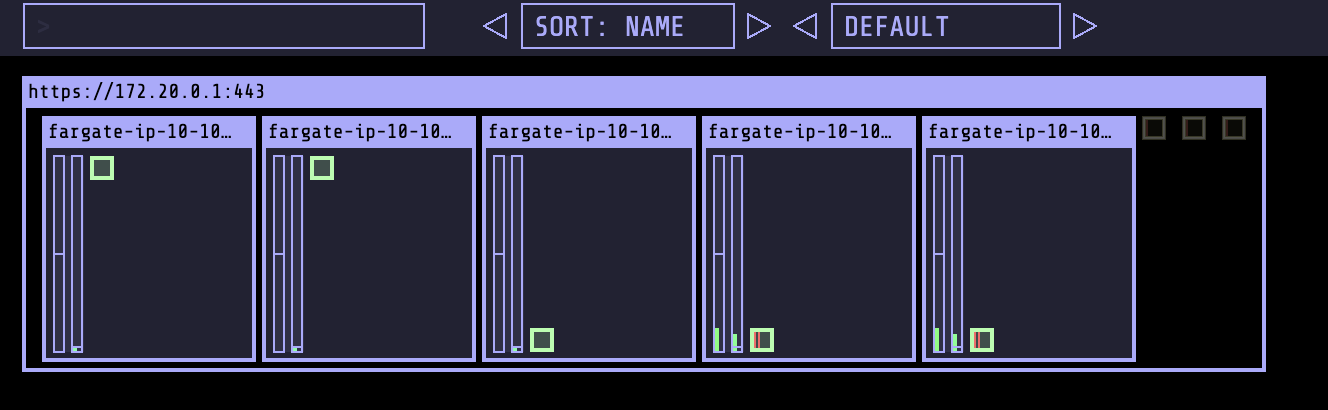
8. kube-ops-view 설치
kube-ops-view란, 노드의 파드 상태 정보를 웹 페이지에서 실시간으로 출력할 수 있는 도구입니다.
다음의 명령어로 해당 내용을 설치해 줍니다.
helm repo add geek-cookbook https://geek-cookbook.github.io/charts/
helm install kube-ops-view geek-cookbook/kube-ops-view --version 1.2.2 --set env.TZ="Asia/Seoul" --namespace kube-system
그런 다음, 애플리케이션에 접근하기 위한 포트포워딩을 설정해 줍니다.
kubectl port-forward deployment/kube-ops-view -n kube-system 8080:8080 &
해당 터미널에서 명령을 수행하고 하기와 같은 내용이 확인되면, 웹 브라우저에서 127.0.0.1:8080으로 접속합니다.
Forwarding from 127.0.0.1:8080 -> 8080
Forwarding from [::1]:8080 -> 8080
Handling connection for 8080
Handling connection for 8080
Handling connection for 8080
...
웹 브라우저에서 확인되는 화면입니다.
http://localhost:8080/#scale=1.5
http://localhost:8080/#scale=3
을 통해서 비율이 확대된 화면을 확인할 수 있습니다.
9. karpenter 개요
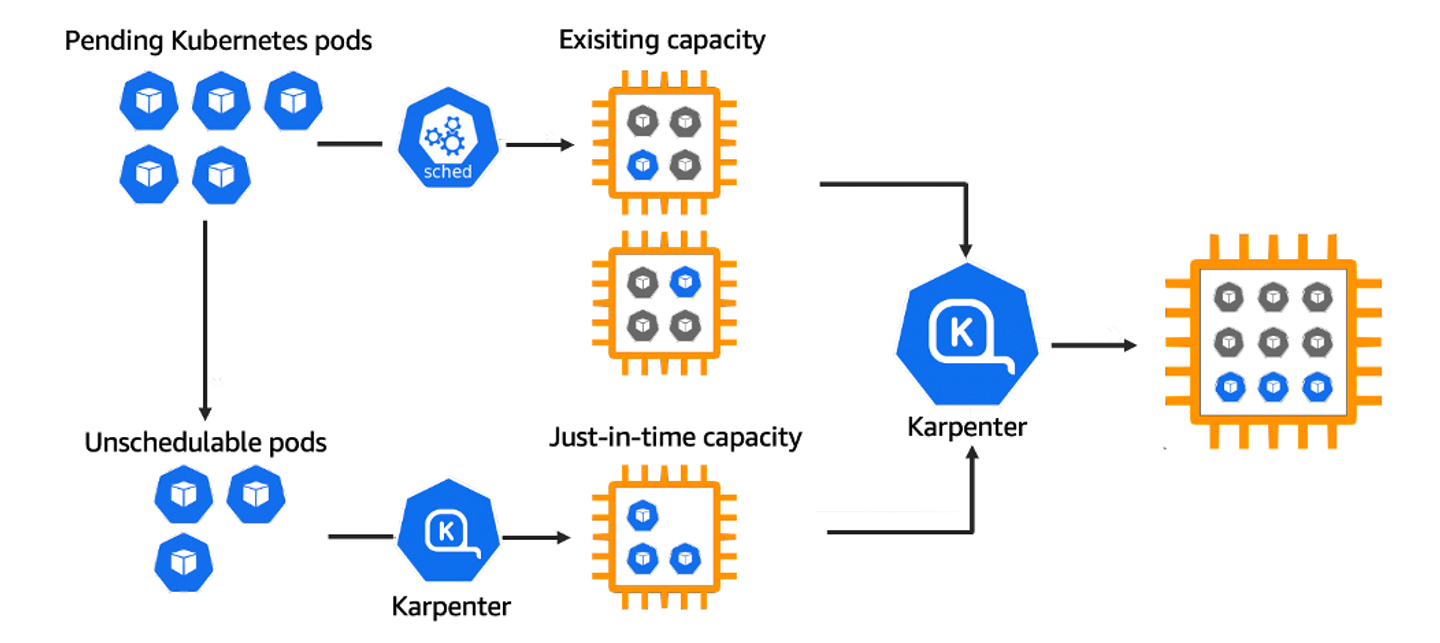
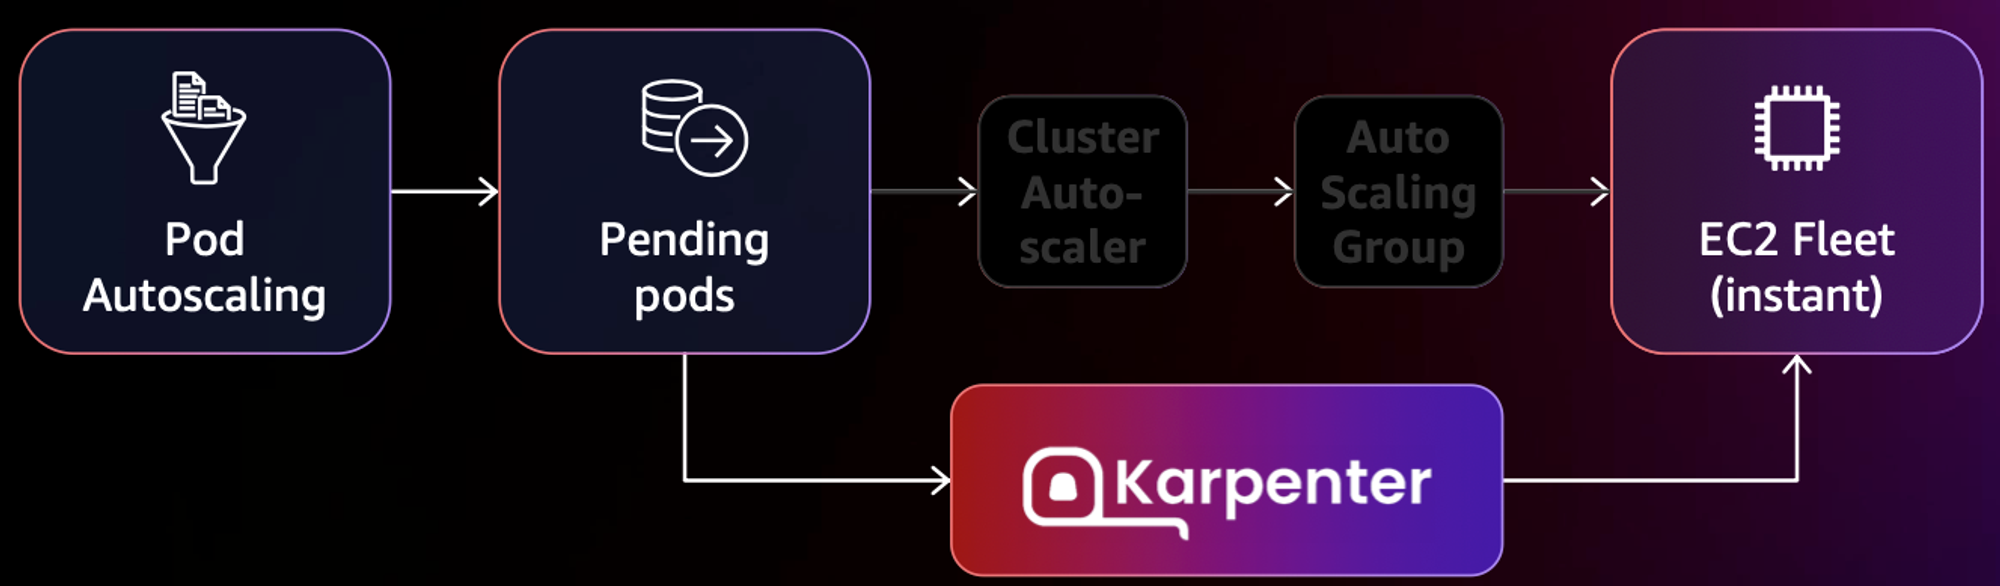
카펜터란 노드 수명 주기 관리 솔루션으로, 단 몇 초 만에 컴퓨팅 리소스 제공할 수 있다는 장점을 갖고 있는 제품입니다.
카펜터의 역할은 다음과 같습니다.
- 모니터링: Kubernetes 스케줄러가 스케줄링할 수 없는 파드를 감시합니다.
- 평가: 파드가 요청한 다양한 스케줄링 제약 조건을 평가합니다.
- 노드 프로비저닝: 파드의 요구 사항을 충족하는 새로운 노드를 생성합니다.
- 스케줄링: 새로 프로비저닝된 노드에 파드를 배치합니다.
- 노드 제거: 필요하지 않은 노드를 삭제합니다.
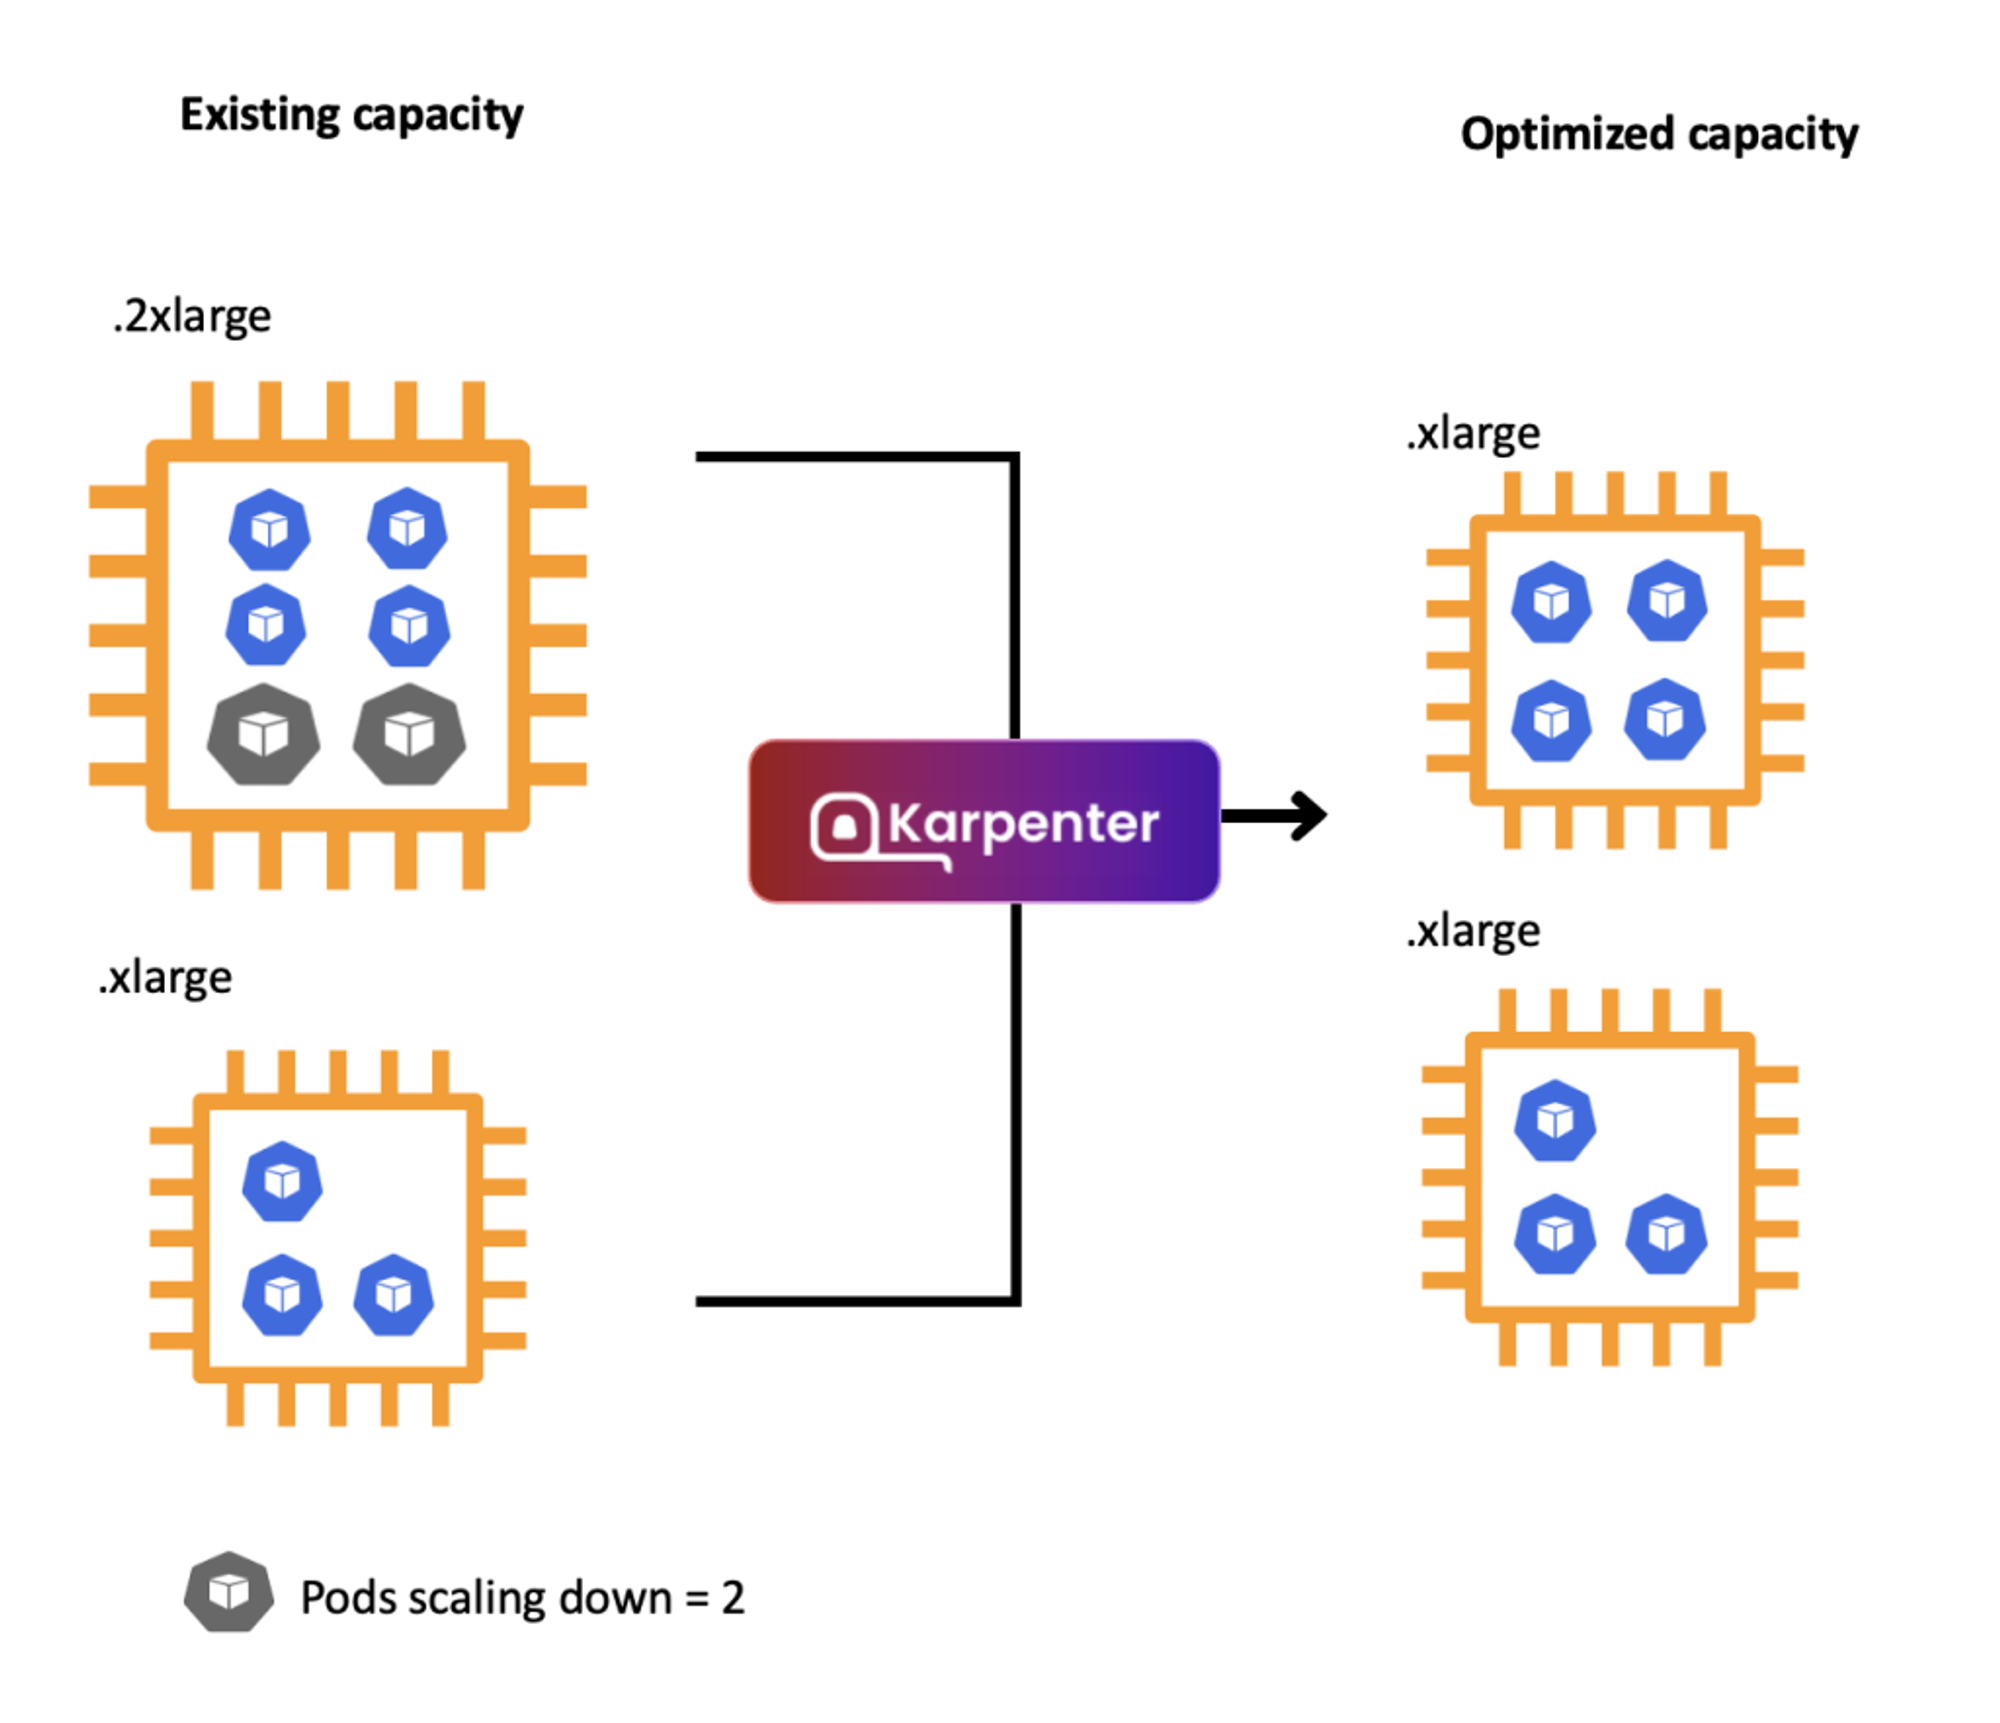
또한 현존 리소스의 용량을 평가하고 최적화된 리소스를 사용할 수 있습니다.
spot workload와 결합 시에는 15개 이상의 인스턴스 유형이 선택되어야지 중단될 위험이 적은 인스턴스를 사용할 수 있습니다.
10. karpenter 설치
다음과 같이 코드를 수정합니다.
---
apiVersion: karpenter.k8s.aws/v1beta1
kind: EC2NodeClass
metadata:
  name: default
spec:
  amiFamily: AL2
  role: karpenter-t101-karpenter
  subnetSelectorTerms:
    - tags:
        karpenter.sh/discovery: t101-karpenter
  securityGroupSelectorTerms:
    - tags:
        karpenter.sh/discovery: t101-karpenter
  tags:
    karpenter.sh/discovery: t101-karpenter
---
apiVersion: karpenter.sh/v1beta1
kind: NodePool
metadata:
  name: default
spec:
  template:
    spec:
      nodeClassRef:
        name: default
      requirements:
        - key: "karpenter.k8s.aws/instance-category"
          operator: In
          values: ["c", "m", "r"]
        - key: "karpenter.k8s.aws/instance-cpu"
          operator: In
          values: ["4", "8", "16", "32"]
        - key: "karpenter.k8s.aws/instance-hypervisor"
          operator: In
          values: ["nitro"]
        - key: "karpenter.k8s.aws/instance-generation"
          operator: Gt
          values: ["2"]
  limits:
    cpu: 1000
  disruption:
    consolidationPolicy: WhenEmpty
    consolidateAfter: 30s
카펜터 파일을 적용합니다.
kubectl apply -f karpenter.yaml
배포된 내용을 확인합니다.
kubectl get ec2nodeclass,nodepool
example.yaml을 다음과 같이 정의합니다.
piVersion: apps/v1
kind: Deployment
metadata:
  name: inflate
spec:
  replicas: 0
  selector:
    matchLabels:
      app: inflate
  template:
    metadata:
      labels:
        app: inflate
    spec:
      terminationGracePeriodSeconds: 0
      containers:
        - name: inflate
          image: public.ecr.aws/eks-distro/kubernetes/pause:3.7
          resources:
            requests:
              cpu: 1
파일을 적용합니다.
kubectl apply -f example.yaml
적용된 내용을 확인합니다.
kubectl get deploy
다음과 같이 확인된다면,
NAME READY UP-TO-DATE AVAILABLE AGE
inflate 0/0 0 0 42s
디플로이먼트의 레플리카 수를 3대로 늘리고 확인해 봅시다.
kubectl scale deployment inflate --replicas=3 && kubectl get pod -w
3대로 늘어난 내용을 확인할 수 있습니다.

11. eks-node-viewer를 통한 확인
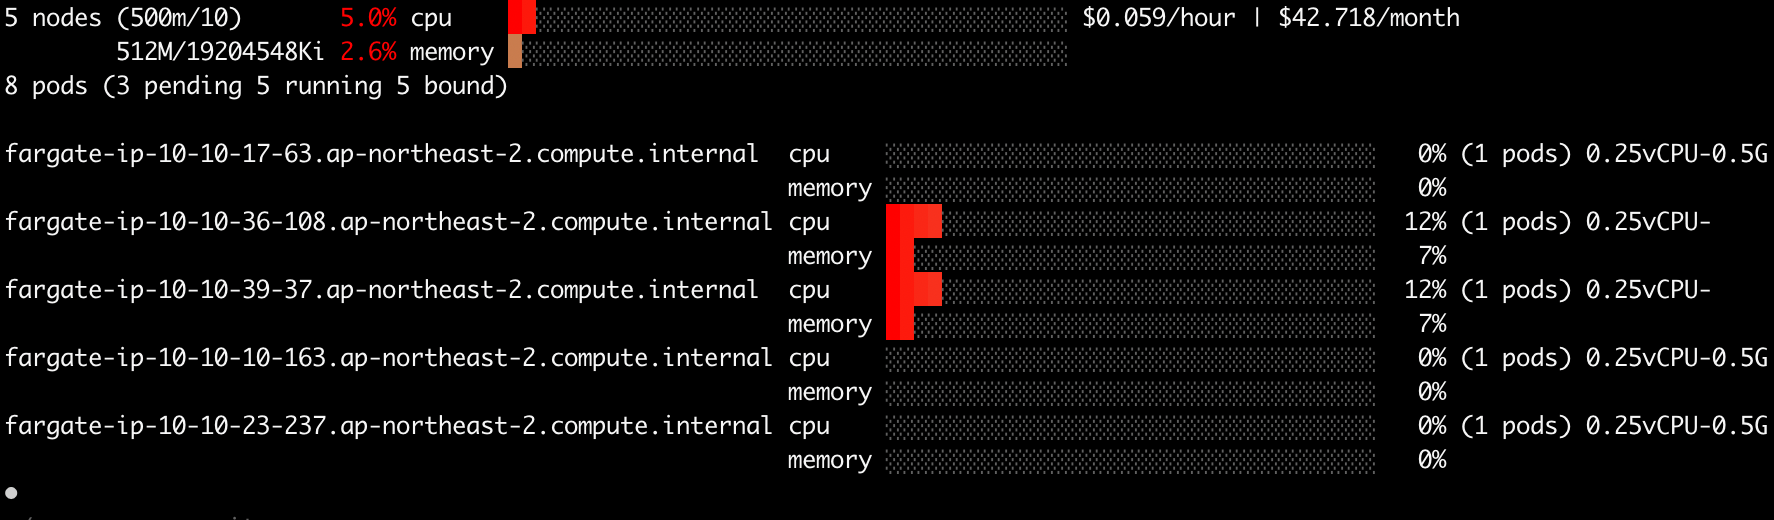
eks-node-viewer를 통해서 다음과 같이 확인하실 수 있습니다.
eks-node-viewer --resources cpu,memory
eks-node-viewer는 다음의 명령어를 통해서 설치합니다.
brew tap aws/tap
brew install eks-node-viewer
12. karpenter controller log 확인
다음의 명령어를 통해서 karpenter 컨트롤러 로그를 확인해 봅시다.
kubectl logs -f -n karpenter -l app.kubernetes.io/name=karpenter -c controller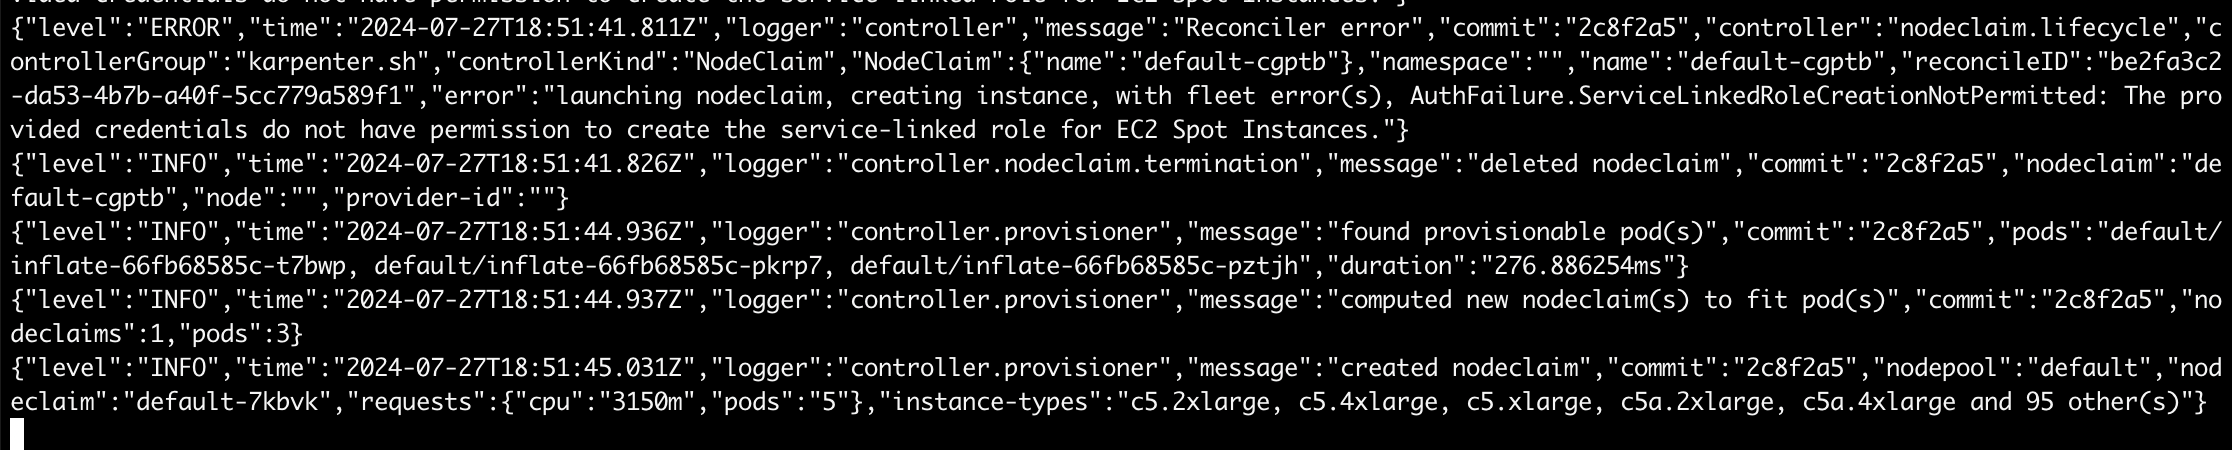
13. 리소스 확인
kubectl get nodes -L karpenter.sh/nodepool -L node.kubernetes.io/instance-type -L topology.kubernetes.io/zone -L karpenter.sh/capacity-type

kubectl get nodeclaims
kubectl get nodeclaims -o yaml | kubectl neat

kubectl delete -f example.yaml

kubectl apply -f karpenter.yaml
14. 리소스 삭제
kube-ops-view 삭제
helm uninstall kube-ops-view -n kube-system
addon & karpenter helm 삭제
terraform destroy -target="module.eks_blueprints_addons" -auto-approve
eks 삭제
terraform destroy -target="module.eks" -auto-approve
VPC 삭제
terraform destroy -auto-approve
VPC 삭제 확인
aws ec2 describe-vpcs --filter 'Name=isDefault,Values=false' --output yaml
설정한 kubeconfig 삭제
rm -rf ~/.kube/config
혹은 kubectl config delete-context T101-Lab을 통해서 해당 컨텍스트만 삭제하세요!

감사합니다.
'DevOps > Terraform' 카테고리의 다른 글
| [OpenTofu] 클라우드 인프라 관리를 위한 새로운 오픈소스 도구 (0) | 2024.08.04 |
|---|---|
| [Terraform] 테라폼 모듈을 활용한 AWS EC2 인스턴스 반복 배포 (2) | 2024.07.14 |
| [Terraform] 테라폼 모듈을 활용한 athena 데이터 카탈로그 배포 (0) | 2024.07.14 |
| [Terraform] 테라폼 코드를 활용한 IPAM 배포 (0) | 2024.07.07 |
| [Terraform] 테라폼 코드를 활용한 레드시프트 배포 (0) | 2024.07.07 |
안녕하세요, 이번 포스팅은 Karpenter on EKS Fargate 배포에 대해서 포스팅을 올립니다.
CloudNet@의 테라폼 스터디 내용을 기반하고 있습니다.
오늘 사용할 Karpenter는 Kubernetes 클러스터 오토스케일러이고,
EKS Fargate는 관리형 서버리스 컨테이너 실행 서비스입니다.
먼저 git clone 후 하기 디렉토리로 이동합니다.
1. git clone
git clone https://github.com/aws-ia/terraform-aws-eks-blueprints
cd terraform-aws-eks-blueprints/patterns/karpenter
tree 명령어를 수행하면 다음과 같이 확인됩니다.
versions.tf는 다음과 같습니다.
2. versions.tf 확인
terraform {
  required_version = ">= 1.3"

  required_providers {
    aws = {
      source  = "hashicorp/aws"
      version = ">= 5.34"
    }
    helm = {
      source  = "hashicorp/helm"
      version = ">= 2.9"
    }
    kubernetes = {
      source  = "hashicorp/kubernetes"
      version = ">= 2.20"
    }
  }

  # ##  Used for end-to-end testing on project; update to suit your needs
  # backend "s3" {
  #   bucket = "terraform-ssp-github-actions-state"
  #   region = "us-west-2"
  #   key    = "e2e/karpenter/terraform.tfstate"
  # }
}
aws, helm, kubernetes 프로바이더의 버전이 명시된 것을 확인합니다.
테라폼도 1.3 이상이 요구됩니다.
3. main.tf 확인
main.tf입니다.
provider "aws" {
  region = local.region
}

# Required for public ECR where Karpenter artifacts are hosted
provider "aws" {
  region = "us-east-1"
  alias  = "virginia"
}

provider "kubernetes" {
  host                   = module.eks.cluster_endpoint
  cluster_ca_certificate = base64decode(module.eks.cluster_certificate_authority_data)

  exec {
    api_version = "client.authentication.k8s.io/v1beta1"
    command     = "aws"
    # This requires the awscli to be installed locally where Terraform is executed
    args = ["eks", "get-token", "--cluster-name", module.eks.cluster_name]
  }
}

provider "helm" {
  kubernetes {
    host                   = module.eks.cluster_endpoint
    cluster_ca_certificate = base64decode(module.eks.cluster_certificate_authority_data)

    exec {
      api_version = "client.authentication.k8s.io/v1beta1"
      command     = "aws"
      # This requires the awscli to be installed locally where Terraform is executed
      args = ["eks", "get-token", "--cluster-name", module.eks.cluster_name]
    }
  }
}

data "aws_ecrpublic_authorization_token" "token" {
  provider = aws.virginia
}

data "aws_availability_zones" "available" {}

locals {
  name   = "t101-${basename(path.cwd)}"
  region = "ap-northeast-2"

  vpc_cidr = "10.10.0.0/16"
  azs      = slice(data.aws_availability_zones.available.names, 0, 3)

  tags = {
    Blueprint  = local.name
    GithubRepo = "github.com/aws-ia/terraform-aws-eks-blueprints"
  }
}

################################################################################
# Cluster
################################################################################

module "eks" {
  source  = "terraform-aws-modules/eks/aws"
  version = "~> 20.11"

  cluster_name                   = local.name
  cluster_version                = "1.30"
  cluster_endpoint_public_access = true

  vpc_id     = module.vpc.vpc_id
  subnet_ids = module.vpc.private_subnets

  # Fargate profiles use the cluster primary security group so these are not utilized
  create_cluster_security_group = false
  create_node_security_group    = false

  enable_cluster_creator_admin_permissions = true

  fargate_profiles = {
    karpenter = {
      selectors = [
        { namespace = "karpenter" }
      ]
    }
    kube_system = {
      name = "kube-system"
      selectors = [
        { namespace = "kube-system" }
      ]
    }
  }

  tags = merge(local.tags, {
    # NOTE - if creating multiple security groups with this module, only tag the
    # security group that Karpenter should utilize with the following tag
    # (i.e. - at most, only one security group should have this tag in your account)
    "karpenter.sh/discovery" = local.name
  })
}

################################################################################
# EKS Blueprints Addons
################################################################################

module "eks_blueprints_addons" {
  source  = "aws-ia/eks-blueprints-addons/aws"
  version = "~> 1.16"

  cluster_name      = module.eks.cluster_name
  cluster_endpoint  = module.eks.cluster_endpoint
  cluster_version   = module.eks.cluster_version
  oidc_provider_arn = module.eks.oidc_provider_arn

  # We want to wait for the Fargate profiles to be deployed first
  create_delay_dependencies = [for prof in module.eks.fargate_profiles : prof.fargate_profile_arn]

  eks_addons = {
    coredns = {
      configuration_values = jsonencode({
        computeType = "Fargate"
        # Ensure that the we fully utilize the minimum amount of resources that are supplied by
        # Fargate https://docs.aws.amazon.com/eks/latest/userguide/fargate-pod-configuration.html
        # Fargate adds 256 MB to each pod's memory reservation for the required Kubernetes
        # components (kubelet, kube-proxy, and containerd). Fargate rounds up to the following
        # compute configuration that most closely matches the sum of vCPU and memory requests in
        # order to ensure pods always have the resources that they need to run.
        resources = {
          limits = {
            cpu = "0.25"
            # We are targeting the smallest Task size of 512Mb, so we subtract 256Mb from the
            # request/limit to ensure we can fit within that task
            memory = "256M"
          }
          requests = {
            cpu = "0.25"
            # We are targeting the smallest Task size of 512Mb, so we subtract 256Mb from the
            # request/limit to ensure we can fit within that task
            memory = "256M"
          }
        }
      })
    }
    vpc-cni    = {}
    kube-proxy = {}
  }

  enable_karpenter = true

  karpenter = {
    repository_username = data.aws_ecrpublic_authorization_token.token.user_name
    repository_password = data.aws_ecrpublic_authorization_token.token.password
  }

  karpenter_node = {
    # Use static name so that it matches what is defined in `karpenter.yaml` example manifest
    iam_role_use_name_prefix = false
  }

  tags = local.tags
}

resource "aws_eks_access_entry" "karpenter_node_access_entry" {
  cluster_name      = module.eks.cluster_name
  principal_arn     = module.eks_blueprints_addons.karpenter.node_iam_role_arn
  kubernetes_groups = []
  type              = "EC2_LINUX"
}

################################################################################
# Supporting Resources
################################################################################

module "vpc" {
  source  = "terraform-aws-modules/vpc/aws"
  version = "~> 5.0"

  name = local.name
  cidr = local.vpc_cidr

  azs             = local.azs
  private_subnets = [for k, v in local.azs : cidrsubnet(local.vpc_cidr, 4, k)]
  public_subnets  = [for k, v in local.azs : cidrsubnet(local.vpc_cidr, 8, k + 48)]

  enable_nat_gateway = true
  single_nat_gateway = true

  public_subnet_tags = {
    "kubernetes.io/role/elb" = 1
  }

  private_subnet_tags = {
    "kubernetes.io/role/internal-elb" = 1
    # Tags subnets for Karpenter auto-discovery
    "karpenter.sh/discovery" = local.name
  }

  tags = local.tags
}
locals 블록을 수정합니다.
locals {
  name   = "t101-${basename(path.cwd)}"
  region = "ap-northeast-2"

  vpc_cidr = "10.10.0.0/16"
  azs      = slice(data.aws_availability_zones.available.names, 0, 3)

  tags = {
    Blueprint  = local.name
    GithubRepo = "github.com/aws-ia/terraform-aws-eks-blueprints"
  }
}
4. outputs.tf 확인
outputs.tf
output "configure_kubectl" {
  description = "Configure kubectl: make sure you're logged in with the correct AWS profile and run the following command to update your kubeconfig"
  value       = "aws eks --region ${local.region} update-kubeconfig --name ${module.eks.cluster_name}"
}
그런 다음, 다음의 명령어를 통해서 확인해 봅니다.
terraform init
tree .terraform
cat .terraform/**modules**/modules.json | jq
tree .terraform/**providers**/registry.terraform.io/hashicorp -L 2
본격적으로, vpc 배포를 진행해 보겠습니다.
다음의 명령어를 통해 기본 vpc를 제외한 vpc 정보를 불러옵니다.
aws ec2 describe-vpcs --filter 'Name=isDefault,Values=false' --output yaml
4. vpc 생성
그런 다음, module.vpc만 호출하여 vpc를 생성합니다.
terraform apply -target="module.vpc" -auto-approve
적용 완료된 내용을 확인합니다.
배포 내용도 확인해 보겠습니다.
terraform state list
terraform show를 통해서 적용된 tfstate 파일을 확인할 수 있습니다.
terraform show
다시 다음 명령을 수행하여 vpc 정보를 확인합니다.
aws ec2 describe-vpcs --filter 'Name=isDefault,Values=false' --output yaml
그리고 다음의 내용을 통해서 vpc를 확인해 봅니다.
echo "data.aws_availability_zones.available" | terraform console
terraform state show 'module.vpc.aws_vpc.this[0]'
terraform state show를 통해서 확인할 수 있는 생성된 vpc의 내용입니다.
다음 내용을 통해서 vpc에 매핑된 subnet을 확인합니다.
VPCID=<생성한 VPC ID>
aws ec2 describe-subnets --filters "Name=vpc-id,Values=$VPCID" | jq
aws ec2 describe-subnets --filters "Name=vpc-id,Values=$VPCID" --output text
terraform state show 'module.vpc.aws_subnet.public[0]'
terraform state show 'module.vpc.aws_subnet.private[0]'
퍼블릭 서브넷 확인 예시 :
5. eks 클러스터 생성
다음의 명령어를 통해서 module.eks를 생성해 보겠습니다.
다소 시간이 걸릴 수 있으니 커피 한잔 하시면서 느긋하게 기다려 보세요!
terraform apply -target="module.eks" -auto-approve
앞서 설정한 outputs.tf 파일의 내용대로 출력이 되는 것을 확인하실 수 있습니다.
그런 다음, terraform state list를 출력해 봅니다.
terraform state list
하기 명령을 수행하면 클러스터 생성시 나온 내용과 동일합니다.
terraform output
configure_kubectl = "aws eks --region ap-northeast-2 update-kubeconfig --name t101-karpenter"
다음으로 EKS 자격증명을 세팅하고, context 이름을 변경하겠습니다.
aws eks --region ap-northeast-2 update-kubeconfig --name t101-karpenter
kubectl config rename-context "arn:aws:eks:ap-northeast-2:$(aws sts get-caller-identity --query 'Account' --output text):cluster/t101-karpenter" "T101-Lab"
다음으로 클러스터 / 노드 / 파드 정보를 확인합니다.
kubectl cluster-info
kubectl get node
kubectl get pod -A
이제 Fargate를 배포해 보겠습니다.
6. Fargate 개요
Cluster Autoscaler가 필요하지 않고, VM 수준의 격리가 가능하다는 것이 특징입니다.
파게이트 프로파일을 통해서 파드가 사용할 서브넷, 네임스페이스, 레이블을 설정할 수 있습니다.
또한 eks 파게이트 스케줄러를 통해서 노드 스케줄링을 설정할 수 있습니다.
7. 리소스 배포
terraform apply -auto-approve
다음의 명령으로 state file을 확인합니다.
terraform state list
이후 배포된 클러스터와 노드 정보를 확인합니다.
kubectl cluster-info
kubectl get nodes -L node.kubernetes.io/instance-type -L topology.kubernetes.io/zone
kubectl get node -owide
노드 정보 확인 :
파드 정보도 확인해 줍니다.
kubectl get pod -A
배포된 헬름 차트도 확인합니다.
helm list -n karpenter
하기 명령을 통해서 karpenter helm chart에 적용된 값을 확인해 봅니다.
helm get values -n karpenter karpenter
적용된 시크릿 정보는 다음의 명령을 통해서 확인합니다.
* 이때, 암호화 적용을 활성화 한다면 비활성화가 불가하니 이 점 유의해 주시기 바랍니다.
kubectl get secret -n karpenter
kubectl get secret -n karpenter sh.helm.release.v1.karpenter.v1 -o json | jq
8. kube-ops-view 설치
kube-ops-view란, 노드의 파드 상태 정보를 웹 페이지에서 실시간으로 출력할 수 있는 도구입니다.
다음의 명령어로 해당 내용을 설치해 줍니다.
helm repo add geek-cookbook https://geek-cookbook.github.io/charts/
helm install kube-ops-view geek-cookbook/kube-ops-view --version 1.2.2 --set env.TZ="Asia/Seoul" --namespace kube-system
그런 다음, 애플리케이션에 접근하기 위한 포트포워딩을 설정해 줍니다.
kubectl port-forward deployment/kube-ops-view -n kube-system 8080:8080 &
해당 터미널에서 명령을 수행하고 하기와 같은 내용이 확인되면, 웹 브라우저에서 127.0.0.1:8080으로 접속합니다.
Forwarding from 127.0.0.1:8080 -> 8080
Forwarding from [::1]:8080 -> 8080
Handling connection for 8080
Handling connection for 8080
Handling connection for 8080
...
웹 브라우저에서 확인되는 화면입니다.
http://localhost:8080/#scale=1.5
http://localhost:8080/#scale=3
을 통해서 비율이 확대된 화면을 확인할 수 있습니다.
9. karpenter 개요
카펜터란 노드 수명 주기 관리 솔루션으로, 단 몇 초 만에 컴퓨팅 리소스 제공할 수 있다는 장점을 갖고 있는 제품입니다.
카펜터의 역할은 다음과 같습니다.
- 모니터링: Kubernetes 스케줄러가 스케줄링할 수 없는 파드를 감시합니다.
- 평가: 파드가 요청한 다양한 스케줄링 제약 조건을 평가합니다.
- 노드 프로비저닝: 파드의 요구 사항을 충족하는 새로운 노드를 생성합니다.
- 스케줄링: 새로 프로비저닝된 노드에 파드를 배치합니다.
- 노드 제거: 필요하지 않은 노드를 삭제합니다.
또한 현존 리소스의 용량을 평가하고 최적화된 리소스를 사용할 수 있습니다.
spot workload와 결합 시에는 15개 이상의 인스턴스 유형이 선택되어야지 중단될 위험이 적은 인스턴스를 사용할 수 있습니다.
10. karpenter 설치
다음과 같이 코드를 수정합니다.
---
apiVersion: karpenter.k8s.aws/v1beta1
kind: EC2NodeClass
metadata:
  name: default
spec:
  amiFamily: AL2
  role: karpenter-t101-karpenter
  subnetSelectorTerms:
    - tags:
        karpenter.sh/discovery: t101-karpenter
  securityGroupSelectorTerms:
    - tags:
        karpenter.sh/discovery: t101-karpenter
  tags:
    karpenter.sh/discovery: t101-karpenter
---
apiVersion: karpenter.sh/v1beta1
kind: NodePool
metadata:
  name: default
spec:
  template:
    spec:
      nodeClassRef:
        name: default
      requirements:
        - key: "karpenter.k8s.aws/instance-category"
          operator: In
          values: ["c", "m", "r"]
        - key: "karpenter.k8s.aws/instance-cpu"
          operator: In
          values: ["4", "8", "16", "32"]
        - key: "karpenter.k8s.aws/instance-hypervisor"
          operator: In
          values: ["nitro"]
        - key: "karpenter.k8s.aws/instance-generation"
          operator: Gt
          values: ["2"]
  limits:
    cpu: 1000
  disruption:
    consolidationPolicy: WhenEmpty
    consolidateAfter: 30s
카펜터 파일을 적용합니다.
kubectl apply -f karpenter.yaml
배포된 내용을 확인합니다.
kubectl get ec2nodeclass,nodepool
example.yaml을 다음과 같이 정의합니다.
piVersion: apps/v1
kind: Deployment
metadata:
  name: inflate
spec:
  replicas: 0
  selector:
    matchLabels:
      app: inflate
  template:
    metadata:
      labels:
        app: inflate
    spec:
      terminationGracePeriodSeconds: 0
      containers:
        - name: inflate
          image: public.ecr.aws/eks-distro/kubernetes/pause:3.7
          resources:
            requests:
              cpu: 1
파일을 적용합니다.
kubectl apply -f example.yaml
적용된 내용을 확인합니다.
kubectl get deploy
다음과 같이 확인된다면,
NAME READY UP-TO-DATE AVAILABLE AGE
inflate 0/0 0 0 42s
디플로이먼트의 레플리카 수를 3대로 늘리고 확인해 봅시다.
kubectl scale deployment inflate --replicas=3 && kubectl get pod -w
3대로 늘어난 내용을 확인할 수 있습니다.
11. eks-node-viewer를 통한 확인
eks-node-viewer를 통해서 다음과 같이 확인하실 수 있습니다.
eks-node-viewer --resources cpu,memory
eks-node-viewer는 다음의 명령어를 통해서 설치합니다.
brew tap aws/tap
brew install eks-node-viewer
12. karpenter controller log 확인
다음의 명령어를 통해서 karpenter 컨트롤러 로그를 확인해 봅시다.
kubectl logs -f -n karpenter -l app.kubernetes.io/name=karpenter -c controller
13. 리소스 확인
kubectl get nodes -L karpenter.sh/nodepool -L node.kubernetes.io/instance-type -L topology.kubernetes.io/zone -L karpenter.sh/capacity-type

kubectl get nodeclaims
kubectl get nodeclaims -o yaml | kubectl neat

kubectl delete -f example.yaml

kubectl apply -f karpenter.yaml
14. 리소스 삭제
kube-ops-view 삭제
helm uninstall kube-ops-view -n kube-system
addon & karpenter helm 삭제
terraform destroy -target="module.eks_blueprints_addons" -auto-approve
eks 삭제
terraform destroy -target="module.eks" -auto-approve
VPC 삭제
terraform destroy -auto-approve
VPC 삭제 확인
aws ec2 describe-vpcs --filter 'Name=isDefault,Values=false' --output yaml
설정한 kubeconfig 삭제
rm -rf ~/.kube/config
혹은 kubectl config delete-context T101-Lab을 통해서 해당 컨텍스트만 삭제하세요!
감사합니다.
'DevOps > Terraform' 카테고리의 다른 글
| [OpenTofu] 클라우드 인프라 관리를 위한 새로운 오픈소스 도구 (0) | 2024.08.04 |
|---|---|
| [Terraform] 테라폼 모듈을 활용한 AWS EC2 인스턴스 반복 배포 (2) | 2024.07.14 |
| [Terraform] 테라폼 모듈을 활용한 athena 데이터 카탈로그 배포 (0) | 2024.07.14 |
| [Terraform] 테라폼 코드를 활용한 IPAM 배포 (0) | 2024.07.07 |
| [Terraform] 테라폼 코드를 활용한 레드시프트 배포 (0) | 2024.07.07 |