
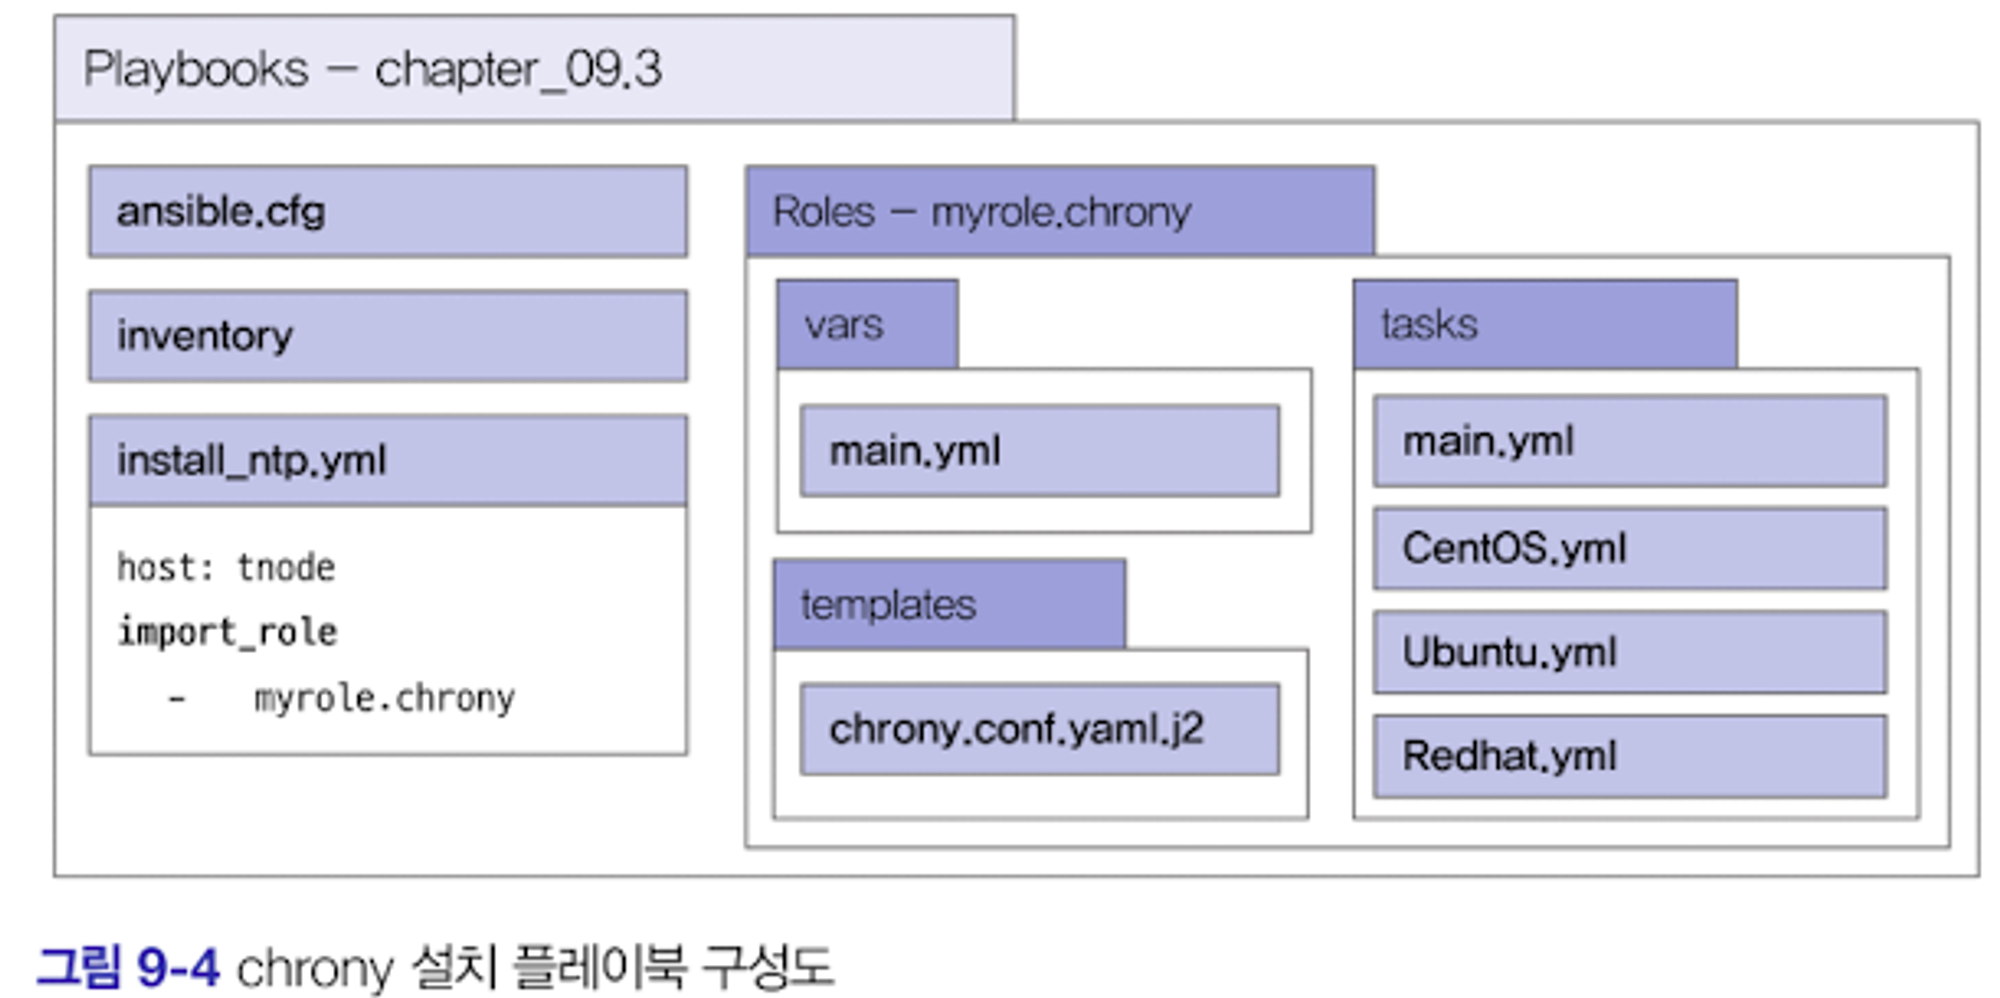
이번 내용의 플레이북 구성도는 다음과 같습니다.
사전 분석
NTP 서버 주소는 메인 플레이북에서 정의한다.
운영체제가 Ubuntu면 apt 모듈을 사용하여 chrony를 설치한다.
운영체제가 CentOS/레드햇이면 dnf 모듈을 사용하여 chrony를 설치한다.
Jinja2 템플릿 방식의 chrony.conf 파일을 대상 호스트로 복사한다.
설정 파일이 복사되면 chrony 서비스를 재시작한다.
다음에도 사용할 수 있도록 롤을 이용하여 설계하고 작성한다.
플레이북 설계
chrony를 서로 다른 운영체제에서 각각의 모듈을 이용하여 설치할 것이므로 롤을 생성하고 호출하는 방식으로 작성합니다.
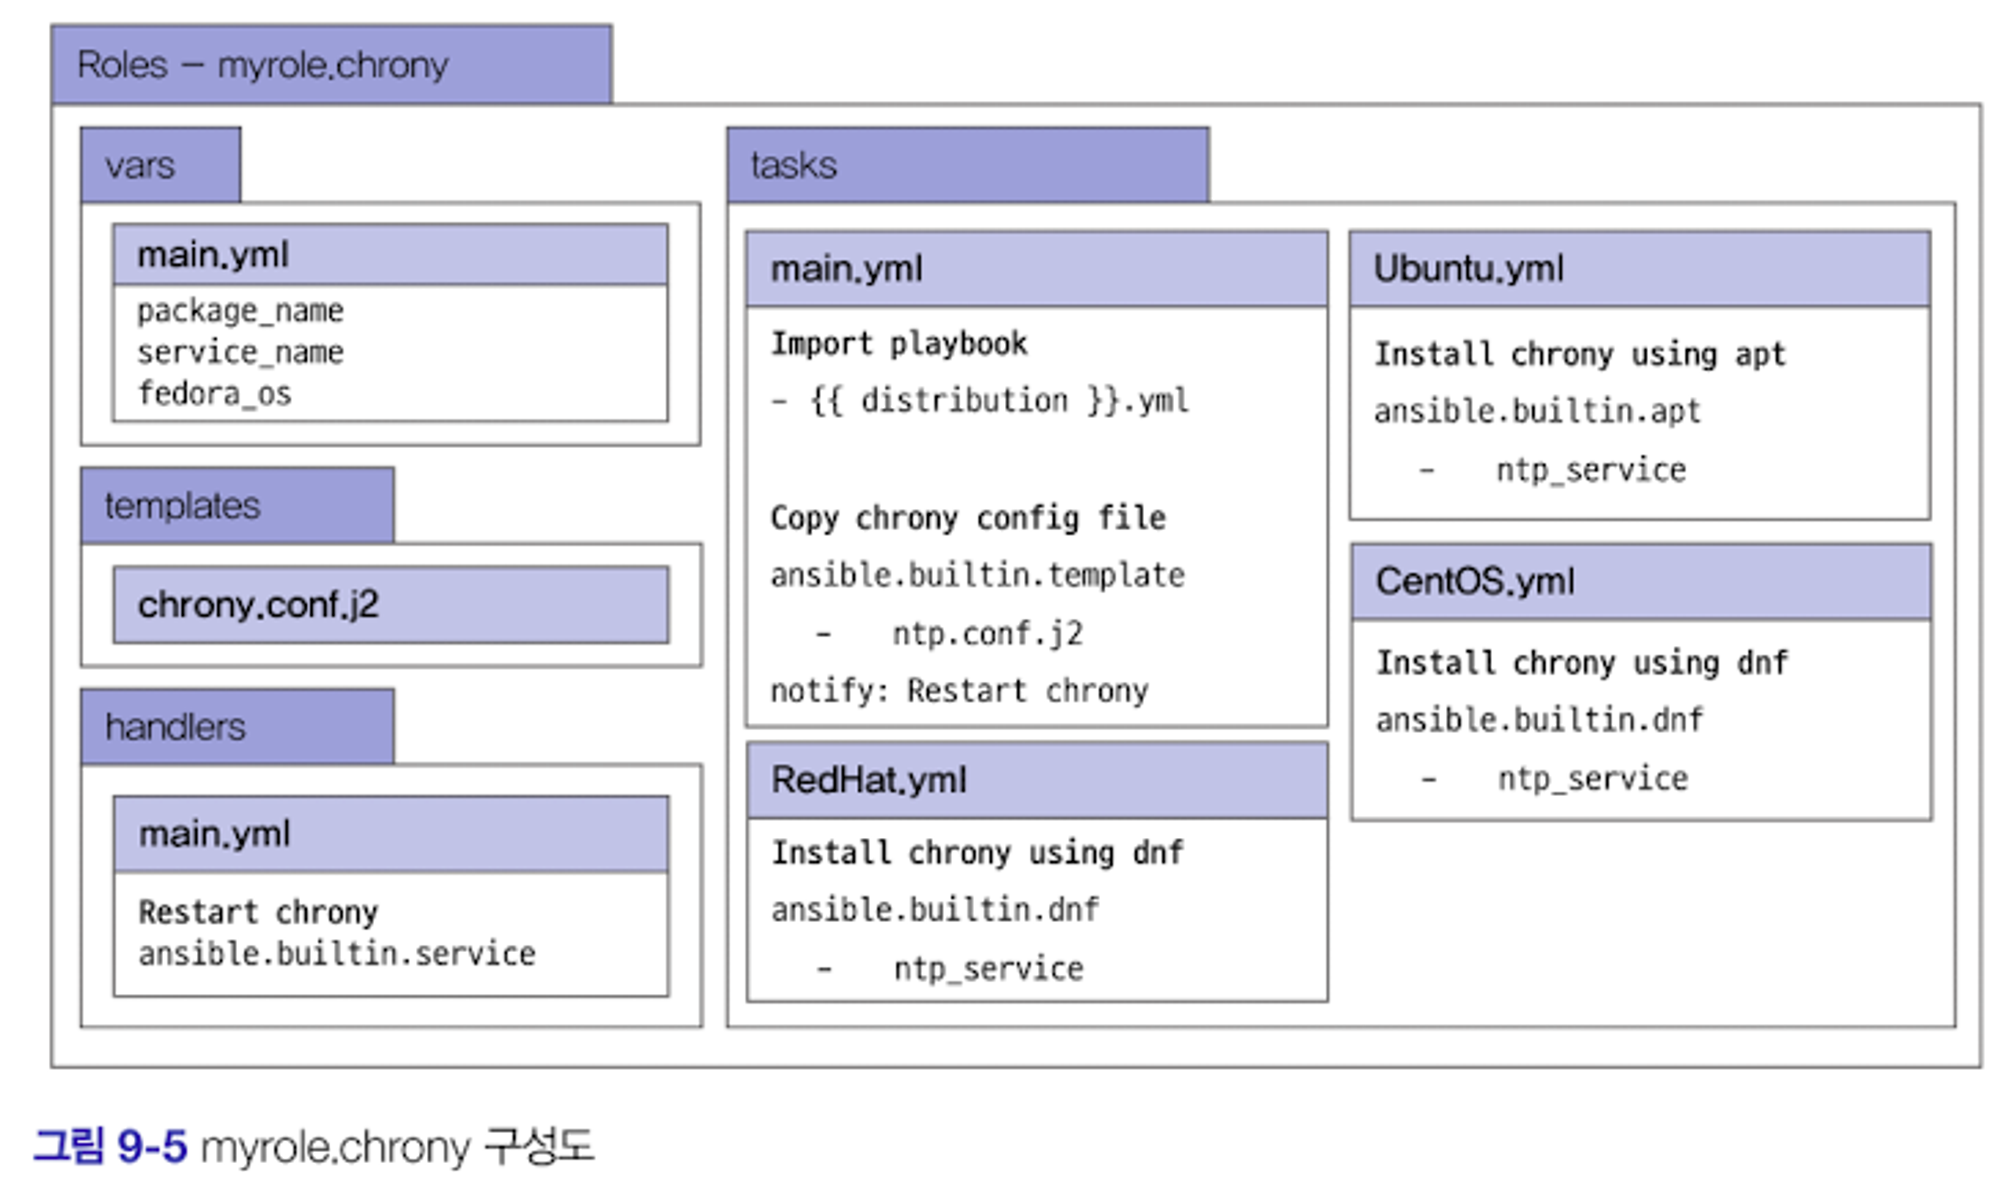
- vars : chrony 서비스 설치를 위한 롤에서는 변수를 정의,,
- templates : 환경 설정 템플릿 설정,
- tasks : 태스크를 정의,
- handlers : 환경 설정 후 chrony 서비스를 재시작.
1) VSCODE에서 remote SSH 접속 시 root 계정으로 로그인 설정
커맨드창(Ctrl + Shift + P) 입력 후 “Remote-SSH: Open Config…” 선택 후 자신의 SSH Config 파일을 열기: ls ~/. ssh/config
# Read more about SSH config files: https://linux.die.net/man/5/ssh_config
Host ansible-server
    HostName 50.1.1.1 <- 각자 자신의 ansible-server 의 유동 공인 IP
    User root
- 커맨드창(Ctrl + Shift + P) 입력 후 “Remote-SSH: Connect…” 선택 후 자신의 ansible-server 선택 : 암호는 qwe123
- 터미널 - 신규 터미널 클릭해서 하단 뷰에 터미널 창 열어서 진행합니다.
# 계정 정보 등 확인
whoami
id
pwd
- ansible 계정의 실습 디렉터리를 생성합니다.
#
su - ansible -c 'mkdir -p ~/ansible-project/chapter_09.3'
ls -l /home/ansible/
VSCODE에서 작업 영역에 폴더 추가 : /home/ansible/ansible-project
whomai
pwd
cd
2) ansible 계정으로 프로젝트 디렉터리 생성 및 ansible.cfg, inventory 파일 작성
chapter_09.3 폴더에서 작업합니다.
# ansible 계정 전환
su - ansible
whoami
cd
pwd

# 프로젝트 디렉터리로 이동
cd ~/ansible-project/chapter_09.3
pwd
/home/ansible/ansible-project/chapter_09.3
ansible.cfg 파일 생성 : remote_user는ansibleansible로 설정
cat <<EOT > ansible.cfg
[defaults]
inventory = ./inventory
remote_user = ansible
ask_pass = false
roles_path = ./roles

[privilege_escalation]
become = true
become_method = sudo
become_user = root
become_ask_pass = false
EOT
inventory 파일 생성
cat <<EOT > inventory
[tnode]
tnode1
tnode2
tnode3
EOT
3) 롤 생성
# --init-path 옵션으로 롤 생성 경로를 ./roles로 설정
ansible-galaxy role init --init-path ./roles myrole.chrony

# 확인
tree roles
tree roles를 수행하면 다음과 같이 확인됩니다.
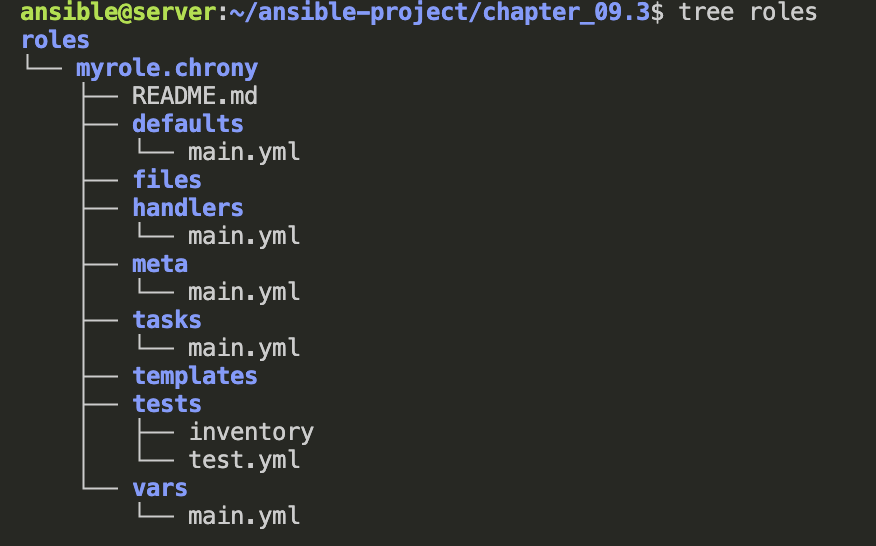
4) 롤 디렉터리에 vars/main.yml 파일 선택 후 아래 내용 추가
chapter_09.3/roles/myrole.chrony/vars/main.yml
---
# vars file for myrole.chrony

package_name : chrony
service_name : chronyd
fedora_os:
 - RedHat
 - CentOS
5) chrony.conf.j2 파일을 생성 : 외부로부터 입력받은 ntp_server 변수를 사용
touch ~/ansible-project/chapter_09.3/roles/myrole.chrony/templates/chrony.conf.j2
롤 디렉터리에 templates/chrony.conf.j2 파일 선택 후 아래 내용 추가
chrony.conf 파일의 내용은 이미 chrony 서비스가 설치되어 있는 서버의 chrony.conf 파일 내용을 참조하여 작성합니다.
chapter_09.3/roles/myrole.chrony/templates/chrony.conf.j2
pool {{ ntp_server }}
driftfile /var/lib/chrony/drift
makestep 1.0 3
rtcsync
allow 10.10.0.0/16
local stratum 10
keyfile /etc/chrony.keys
leapsectz right/UTC
logdir /var/log/chrony
6) 핸들러에는 chrony 서비스를 재시작하는 태스크가 포함됩니다.
chapter_09.3/roles/myrole.chrony/handlers/main.yml
---
# handlers file for myrole.chrony

- name: Restart chrony
  ansible.builtin.service:
    name: "{{ service_name }}"
    state: restarted
7) 메인 태스크 작성
ansible_facts.distribution 팩트 변수를 이용하여 다른 파일에서 태스크를 포함시킵니다.
운영체제에 맞는 chrony 환경 설정 파일 설정 복사, 복사 후 notify로 ‘Restart chrony’ 핸들러 호출합니다.
chapter_09.3/roles/myrole.chrony/tasks/main.yml
---
# tasks file for myrole.chrony

- name: Import playbook
  ansible.builtin.include_tasks:
    file: "{{ ansible_facts.distribution }}.yml"

- name: Copy chrony config file when Ubuntu
  ansible.builtin.template:
    src: chrony.conf.j2
    dest: /etc/chrony/chrony.conf
  notify: "Restart chrony"
  when: ansible_facts.distribution == "Ubuntu"

- name: Copy chrony config file when Other OS
  ansible.builtin.template:
    src: chrony.conf.j2
    dest: /etc/chrony.conf
  notify: "Restart chrony"
  when: ansible_facts.distribution in fedora_os
8) 메인 태스크에서 호출된 운영체제별 플레이북을 하나씩 작성
아래 touch로 파일 생성 후 작업 폴더 창에 새로고침 아이콘 클릭
touch ~/ansible-project/chapter_09.3/roles/myrole.chrony/tasks/RedHat.yml
touch ~/ansible-project/chapter_09.3/roles/myrole.chrony/tasks/CentOS.yml
touch ~/ansible-project/chapter_09.3/roles/myrole.chrony/tasks/Ubuntu.yml
chapter_09.3/roles/myrole.chrony/tasks/RedHat.yml
---

- name: Install chrony using dnf
  ansible.builtin.dnf:
    name: "{{ package_name }}"
    state: latest
chapter_09.3/roles/myrole.chrony/tasks/CentOS.yml
---

- name: Install chrony using dnf
  ansible.builtin.dnf:
    name: "{{ package_name }}"
    state: latest
chapter_09.3/roles/myrole.chrony/tasks/Ubuntu.yml
---

- name: Install chrony using apt
  ansible.builtin.apt:
    name: "{{ package_name }}"
    state: latest
chapter_09.3/install_ntp.yml
---

- hosts: tnode
  roles:
    - role: myrole.chrony
      ntp_server: 0.kr.pool.ntp.org
9) 플레이북 실행
# 문법 체크
ansible-playbook --syntax-check install_ntp.yml

# 플레이북 실행 : when문을 통해 해당 운영체제에 따라 특정 태스크만 실행됨
ansible-playbook install_ntp.yml

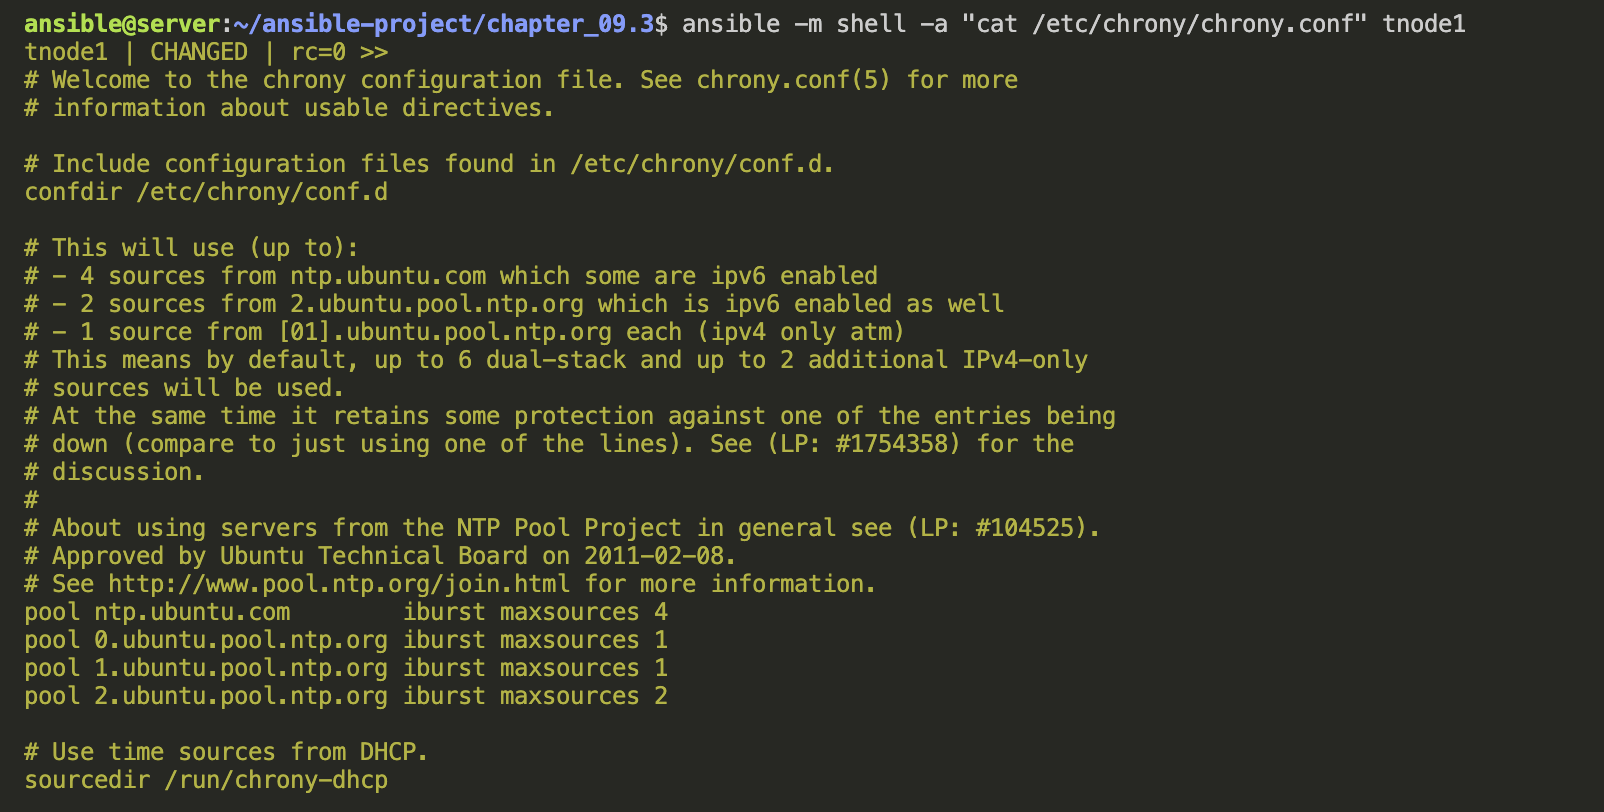
10) 확인
ansible -m shell -a "cat /etc/chrony/chrony.conf" tnode1
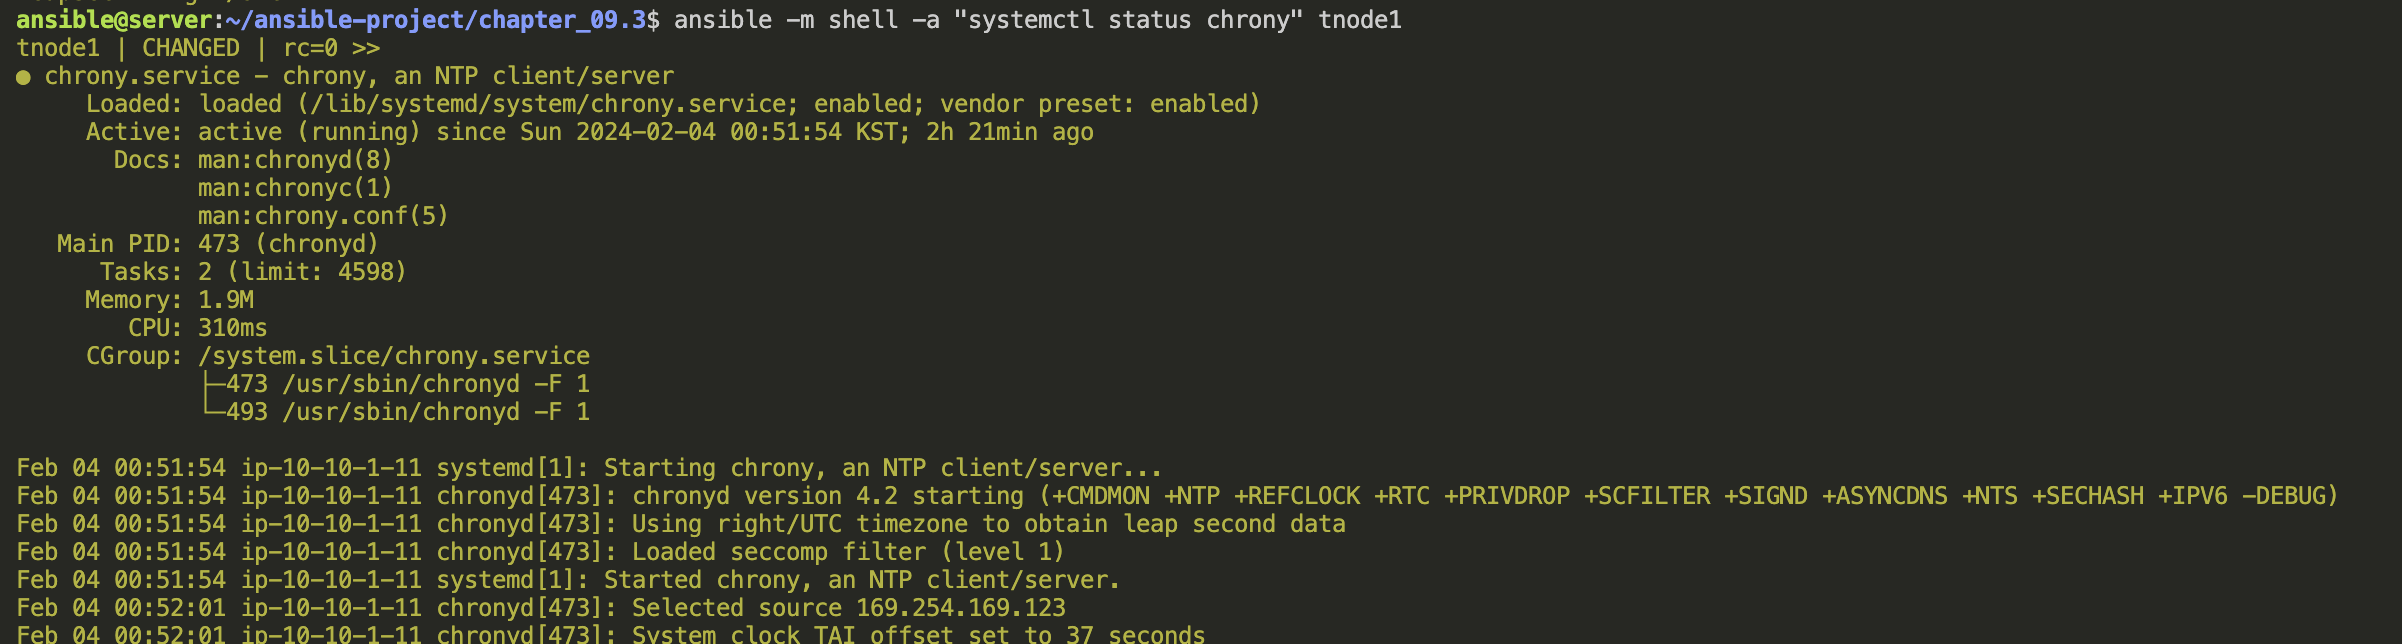
ansible -m shell -a "systemctl status chrony" tnode1
11) 플레이북 내의 hosts를 tnode → tnode1로 변경하여 tnode1만 실행해 봅니다.
---
- hosts: tnode1
  roles:
    - role: myrole.chrony
      ntp_server: 0.kr.pool.ntp.org
12) 실행
#
ansible-playbook install_ntp.yml
...

'DevOps > Ansible' 카테고리의 다른 글
| [Ansible 101] 호스트명 설정하기 (0) | 2024.02.04 |
|---|---|
| [Ansible 101] 환경 설정 자동화 (0) | 2024.02.04 |
| [Ansible 101] SSH 키 생성 및 복사하기 (1) | 2024.02.04 |
| [Ansible 101] 사용자 계정 생성하기 (2) | 2024.02.04 |
| [Ansible 101] 2주차 도전과제 (0) | 2024.01.21 |
이번 내용의 플레이북 구성도는 다음과 같습니다.
사전 분석
NTP 서버 주소는 메인 플레이북에서 정의한다.
운영체제가 Ubuntu면 apt 모듈을 사용하여 chrony를 설치한다.
운영체제가 CentOS/레드햇이면 dnf 모듈을 사용하여 chrony를 설치한다.
Jinja2 템플릿 방식의 chrony.conf 파일을 대상 호스트로 복사한다.
설정 파일이 복사되면 chrony 서비스를 재시작한다.
다음에도 사용할 수 있도록 롤을 이용하여 설계하고 작성한다.
플레이북 설계
chrony를 서로 다른 운영체제에서 각각의 모듈을 이용하여 설치할 것이므로 롤을 생성하고 호출하는 방식으로 작성합니다.
- vars : chrony 서비스 설치를 위한 롤에서는 변수를 정의,,
- templates : 환경 설정 템플릿 설정,
- tasks : 태스크를 정의,
- handlers : 환경 설정 후 chrony 서비스를 재시작.
1) VSCODE에서 remote SSH 접속 시 root 계정으로 로그인 설정
커맨드창(Ctrl + Shift + P) 입력 후 “Remote-SSH: Open Config…” 선택 후 자신의 SSH Config 파일을 열기: ls ~/. ssh/config
# Read more about SSH config files: https://linux.die.net/man/5/ssh_config
Host ansible-server
    HostName 50.1.1.1 <- 각자 자신의 ansible-server 의 유동 공인 IP
    User root
- 커맨드창(Ctrl + Shift + P) 입력 후 “Remote-SSH: Connect…” 선택 후 자신의 ansible-server 선택 : 암호는 qwe123
- 터미널 - 신규 터미널 클릭해서 하단 뷰에 터미널 창 열어서 진행합니다.
# 계정 정보 등 확인
whoami
id
pwd
- ansible 계정의 실습 디렉터리를 생성합니다.
#
su - ansible -c 'mkdir -p ~/ansible-project/chapter_09.3'
ls -l /home/ansible/
VSCODE에서 작업 영역에 폴더 추가 : /home/ansible/ansible-project
whomai
pwd
cd
2) ansible 계정으로 프로젝트 디렉터리 생성 및 ansible.cfg, inventory 파일 작성
chapter_09.3 폴더에서 작업합니다.
# ansible 계정 전환
su - ansible
whoami
cd
pwd

# 프로젝트 디렉터리로 이동
cd ~/ansible-project/chapter_09.3
pwd
/home/ansible/ansible-project/chapter_09.3
ansible.cfg 파일 생성 : remote_user는ansibleansible로 설정
cat <<EOT > ansible.cfg
[defaults]
inventory = ./inventory
remote_user = ansible
ask_pass = false
roles_path = ./roles

[privilege_escalation]
become = true
become_method = sudo
become_user = root
become_ask_pass = false
EOT
inventory 파일 생성
cat <<EOT > inventory
[tnode]
tnode1
tnode2
tnode3
EOT
3) 롤 생성
# --init-path 옵션으로 롤 생성 경로를 ./roles로 설정
ansible-galaxy role init --init-path ./roles myrole.chrony

# 확인
tree roles
tree roles를 수행하면 다음과 같이 확인됩니다.
4) 롤 디렉터리에 vars/main.yml 파일 선택 후 아래 내용 추가
chapter_09.3/roles/myrole.chrony/vars/main.yml
---
# vars file for myrole.chrony

package_name : chrony
service_name : chronyd
fedora_os:
 - RedHat
 - CentOS
5) chrony.conf.j2 파일을 생성 : 외부로부터 입력받은 ntp_server 변수를 사용
touch ~/ansible-project/chapter_09.3/roles/myrole.chrony/templates/chrony.conf.j2
롤 디렉터리에 templates/chrony.conf.j2 파일 선택 후 아래 내용 추가
chrony.conf 파일의 내용은 이미 chrony 서비스가 설치되어 있는 서버의 chrony.conf 파일 내용을 참조하여 작성합니다.
chapter_09.3/roles/myrole.chrony/templates/chrony.conf.j2
pool {{ ntp_server }}
driftfile /var/lib/chrony/drift
makestep 1.0 3
rtcsync
allow 10.10.0.0/16
local stratum 10
keyfile /etc/chrony.keys
leapsectz right/UTC
logdir /var/log/chrony
6) 핸들러에는 chrony 서비스를 재시작하는 태스크가 포함됩니다.
chapter_09.3/roles/myrole.chrony/handlers/main.yml
---
# handlers file for myrole.chrony

- name: Restart chrony
  ansible.builtin.service:
    name: "{{ service_name }}"
    state: restarted
7) 메인 태스크 작성
ansible_facts.distribution 팩트 변수를 이용하여 다른 파일에서 태스크를 포함시킵니다.
운영체제에 맞는 chrony 환경 설정 파일 설정 복사, 복사 후 notify로 ‘Restart chrony’ 핸들러 호출합니다.
chapter_09.3/roles/myrole.chrony/tasks/main.yml
---
# tasks file for myrole.chrony

- name: Import playbook
  ansible.builtin.include_tasks:
    file: "{{ ansible_facts.distribution }}.yml"

- name: Copy chrony config file when Ubuntu
  ansible.builtin.template:
    src: chrony.conf.j2
    dest: /etc/chrony/chrony.conf
  notify: "Restart chrony"
  when: ansible_facts.distribution == "Ubuntu"

- name: Copy chrony config file when Other OS
  ansible.builtin.template:
    src: chrony.conf.j2
    dest: /etc/chrony.conf
  notify: "Restart chrony"
  when: ansible_facts.distribution in fedora_os
8) 메인 태스크에서 호출된 운영체제별 플레이북을 하나씩 작성
아래 touch로 파일 생성 후 작업 폴더 창에 새로고침 아이콘 클릭
touch ~/ansible-project/chapter_09.3/roles/myrole.chrony/tasks/RedHat.yml
touch ~/ansible-project/chapter_09.3/roles/myrole.chrony/tasks/CentOS.yml
touch ~/ansible-project/chapter_09.3/roles/myrole.chrony/tasks/Ubuntu.yml
chapter_09.3/roles/myrole.chrony/tasks/RedHat.yml
---

- name: Install chrony using dnf
  ansible.builtin.dnf:
    name: "{{ package_name }}"
    state: latest
chapter_09.3/roles/myrole.chrony/tasks/CentOS.yml
---

- name: Install chrony using dnf
  ansible.builtin.dnf:
    name: "{{ package_name }}"
    state: latest
chapter_09.3/roles/myrole.chrony/tasks/Ubuntu.yml
---

- name: Install chrony using apt
  ansible.builtin.apt:
    name: "{{ package_name }}"
    state: latest
chapter_09.3/install_ntp.yml
---

- hosts: tnode
  roles:
    - role: myrole.chrony
      ntp_server: 0.kr.pool.ntp.org
9) 플레이북 실행
# 문법 체크
ansible-playbook --syntax-check install_ntp.yml

# 플레이북 실행 : when문을 통해 해당 운영체제에 따라 특정 태스크만 실행됨
ansible-playbook install_ntp.yml
10) 확인
ansible -m shell -a "cat /etc/chrony/chrony.conf" tnode1
ansible -m shell -a "systemctl status chrony" tnode1
11) 플레이북 내의 hosts를 tnode → tnode1로 변경하여 tnode1만 실행해 봅니다.
---
- hosts: tnode1
  roles:
    - role: myrole.chrony
      ntp_server: 0.kr.pool.ntp.org
12) 실행
#
ansible-playbook install_ntp.yml
...
'DevOps > Ansible' 카테고리의 다른 글
| [Ansible 101] 호스트명 설정하기 (0) | 2024.02.04 |
|---|---|
| [Ansible 101] 환경 설정 자동화 (0) | 2024.02.04 |
| [Ansible 101] SSH 키 생성 및 복사하기 (1) | 2024.02.04 |
| [Ansible 101] 사용자 계정 생성하기 (2) | 2024.02.04 |
| [Ansible 101] 2주차 도전과제 (0) | 2024.01.21 |